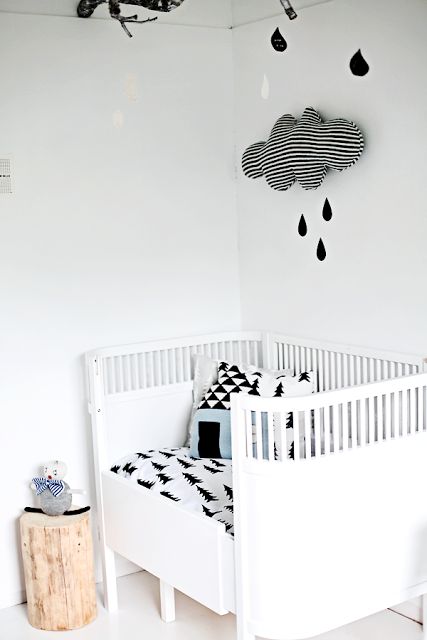
Nursery ideas

Listen up, Kate…

I’m sorry if I’m about to offend lots of you, but there is nothing I like less than a generic nursery furniture set – BORING! They are usually white, made from horrible laminated wood and a really dull shape. Worst of all, the furniture can only be used for a nursery, so it becomes redundant when the child grows up. I also dislike blue or pink gender-specific rooms.

Here are my tips for making a nursery more exciting, more interesting and a little less generic….

Tip one: Use vintage furniture

Vintage library drawers

Vintage retro drawers in nursery

Vintage retro cot

Tip two: Don’t use pastel or gender-specific colours

Yellow and grey retro nursery

Red themed nursery

Monochrome Scandinavian style nursery

Tip three: Source interesting wallpaper

Un Dimanche a Paris wallpaper

Available from Famille Summer Belle.

Available from Ferm Living.

Ferm Living wallpaper

Available from Ferm Living.

Mini Moderns Whitby Lido wallpaper

Available from Mini Moderns.

Tip four: Paint your existing furniture instead of buying a nursery set

Painted child's wardrobe

Painted nursery furniture

Painted wardrobe for nursery

Tip five: Add interesting art work

Retro film poster in nursery

Mimi's circus print

Available from Mimi’s Circus.

Vintage educational chart

Tip six: Use vintage fabrics

Vintage blankets in kitsch nursery

Vintage lampshade in nursery

Vintage lamp and fabrics in nursery

Vintage patchwork blanket in nursery

What do you think? Do you like these ideas or are you a more traditional pink or blue kind of person? Have you recently decorated a nursery and done something a bit different to the norm? I’d love to see pics – email katy@18.200.196.112 x

P.S. Kate – I’ll be expecting a pic from you, too.

Beautiful stairs

For a long time now, I’ve been trying to convince Jules to create our ‘five year plan’. Sad, I know, but I’m a bit of a control freak and like to know where I will be and what I will be doing in the near future (even though I know, through experience, that plans never work out the way you want them to).

This weekend, I have finally managed to pin him down to agree to buying a house in the next year. This decision has mainly been influenced by our new puppy, Otto, who needs a garden (I knew this would happen, hence agreeing to get a puppy !). The idea of having a house – hopefully a period one – and being able to decorate and furnish it, is almost too exciting to bear. So, I am going to begin by dreaming of stairs…

When you move into a new house, there is always work that needs to be done and money that needs to be spent. You have to prioritise and make compromises and I am always looking for ways of saving money, whilst making my home as nice as can be.

We are currently away for a week, so I am unable to make anything or take photos of my own, so I am going to show you some stairway inspiration that I have found from Pinterest. All of these ideas are achievable, cheap and relatively easy and would be a good place to save some precious money when moving into a new home.

Inspiration…

The first idea is to use wallpaper to decorate stair risers. Sarah Moore is a vintage designer and writer and here is an excerpt from her book Vintage Home with a tutorial for these gorgeous stairs:

Vintage wallpapered floral stairs

You will need:

  • Tape measure
  • Pencil
  • Metal ruler
  • Thick card for template
  • Scissors or craft knife and board
  • Selection of vintage papers
  • PVA glue and brush
  • Clear acrylic varnish

Tutorial:

  • Measure one of the risers in the middle of the staircase and use the dimensions to create a card template using scissors or a craft knife and board. Check that this fits on all the steps – the first and last often vary slightly.
  • On the back of your wallpaper, draw around the template, then cut out the pieces. Measure and cut out any risers that vary from the template.
  • Make sure the stairs are free of dust and any loose particles, then paint one riser at a time with a thin layer of PVA glue and smooth the paper in place. Push out any air bubbles or creases towards the edge of the stairs. Pay particular attention to the edges, ensuring that they are glued in place.
  • Wait until the glue is totally dry, about 24 hours, then cover the surface of each riser with a light coat of clear acrylic varnish to protect the paper.

Other ideas…

Painted banister

I love the simplicity of this hallway and the striking addition of colour to the banister rail.

Grain sack stair runner

This is a great idea, instead of spending a fortune on a professionally fitted stair runner. This grain sack fabric is tough and hard wearing and can be attached using glue. Stair runner tutorial here.

Painted blue stair case

I did a post recently about paint effects and this is a good example of how playing around with colour can be an easy way to add interest to any home.

Painted stair runner

A cheap, stylish alternative to a traditional stair runner. I like the colour a lot.

Natural wood stair runner

Or, just leave the middle of the stairs natural wood, which ties in well with the beautiful banister.

Stripy painted stair case

A little more tricky to do and very time consuming. Would definitely be a talking point.

Painted duck egg staircase

By painting the stair risers the same colour as the walls, with a different tone for the treads, creates a clean, simple look.

Now, I’m off to traipse through Right Move…I’m sure I can get a year down to six months. Jules is going to regret entertaining this idea. Ha!


My secret closet

I have a secret. My hallway cupboard is what I imagine hell to be like: cluttered, disorganised and things fall on me every time I open it. My hallway cupboard is my nemesis.  It always reminds me of the ‘Friends’ episode that reveals Monica’s secret closet, which is crammed with rubbish. It is the complete opposite to the rest of her apartment, which is so organised, tidy and ordered (much like my flat – probably achieved because I have such a big cupboard filled with crap!).

I have decided that the hallway cupboard is on my list of summer projects. It has become even more crucial in the light of getting a new puppy, who requires lots of space, toys, food, blankets so we need as much organised storage space as possible.

I am very embarrassed to reveal this ‘before’ picture to you…

Tips to declutter

Shameful!

My task is to declutter the cupboard and then try to create storage solutions so the items we need to keep are accessible, organised and, therefore, useable. At the moment, for fear of everything falling on my head, I bearly use any of the stuff in here, except the hoover.

I will show you the results in a few weeks, as I finish work for the summer this week. In the meantime I want to share with you my tips for decluttering your home.

1) Focus on one small area at a time

If you try to set aside a whole weekend to declutter your entire home, firstly, you’ll have a really boring weekend and secondly, I bet you won’t get it done as you’ll lose momentum and motivation. If you try to do too much at once, often what happens is you make so much mess and dis-order you end up with stuff everywhere, which becomes overwhelming and dis-heartening. You then run out of time and your home is left in total chaos. Instead, try  to focus on one small area at a time as this is much more manageable and won’t leave you exhausted and annoyed e.g. your desk, a shelf in your wardrobe, dining table, the drawer of your bedside table, bathroom cabinet, one kitchen drawer.

2) Choose to declutter an area of your home you use every day

Start with the areas you use everyday, that annoy you everyday day e.g. the hallway table, your underwear drawer, the cutlery drawer. That way you will immediately notice the difference and feel more motivated to carry on elsewhere.

3) Tidy first

Never start a decluttering job in a messy room. If you begin with a tidy room you will find the job much easier as you will have clear floorspace and there will be no confusion over what is clutter and what is mess.

4) Don’t stop until you are finished

Try really hard not to get sidetracked by reminiscing about long forgotten treasures you may come across or whatever else. If you leave the job half-done, you are far less likelty to return to it and you will have succeeded in making your home even more disorganised!

5) Be organised

When decluttering use four different bags or boxes labelled: charity/giveaway/sell, rubbish, recycle, keep. The boxes/bags are a good idea as it keeps your decluttering organised as otherwise the piles can start to merge and the process becomes confusing.  Once you have filled your four bags/boxes, don’t leave them in the hallway – take them out to the bins, put them in your car, ready to be dropped at the charity shop etc. If there are things that you can’t bear to get rid of, but you know full well you don’t need them anymore, give them  away to a new home! Far too many of us buy everything new, whereas we would all save a lot of money and the environment if we shared our belongings.

6) Declutter by yourself

Controversial, I know, but I like to declutter by myself and take executive decisions on what we need/don’t need. The main reason for this is that if you do it with someone else you end up discussing every single item, which wastes a huge amount of time. I will often get rid of things, without conferring, and no one even notices that anything is missing….I hope Jules doesn’t read this!

7) Declutter first and then buy new storage solutions

It’s important to clear first before spending a fortune on new storage solutions. Figure out what you are going to keep and then you can work out what you need to buy to organise what is left.


Let’s hope my hallway cupboard will look something like this in the end…

Organised closet

Or this…

Organised linen cupboard

Or this…

Organised linen closet

I have already started decluttering my kitchen cupboards and used some easy storage solutions, which I will share with you at the end of this week.

Happy decluttering!

P.S. Please don’t judge me by my hallway cupboard…!


Liberty Lifestyle

Hope everyone has had a blissful week in the sun; the weekend was so glorious, spent up on the roof garden and then lunch and tennis with friends and family on Sunday. I loved every minute, apart from Otto digging enormous holes in my mum’s freshly laid turf. Bad dog.

Anyhoo, I was planning on doing some sewing at the weekend (before the sun started to shine) because I recently won a Liberty craft competition. The challenge was to use Liberty Lifestyle fabrics in any creative way and instagram the result. Here are my entries:

How to make a magnetic noticeboard board

I made this magnetic noticeboard from a baking sheet and Liberty’s Woolf print. Find the tutorial here.

Tea light jam jars

I lined this tea light jar with strips of Lytton print. Find the tutorial here.

Liberty Lifestyle blind

I made this ‘cheaters’ blind by sticking Cranston print onto a really cheap roller blind. Find the tutorial here.

Liberty print apron

I customised this child’s apron with Lytton print. Find the tutorial here.

How to make a Liberty baby blanket

I made a reversible baby blanket with Dorothy and Woolf prints. Find the tutorial here.

Liberty Lifestyle fat quarter bundle

I was thrilled to win one of the bundles of Liberty Lifestyle fabric and now I have to decide what to make with it. Any ideas?

P.S. If you want to buy any of the Liberty Lifestyle prints, Fabrics Galore is a great haberdashery that stocks all of the prints and you can order online with ease.


Abigail Borg

Abigail Borg is an illustrator and surface pattern designer with a love for hand drawn design. Her designs are all based on nature and beautiful botanicals:

My style is unique and takes unusual flowers and plants and uses them as a backdrop to provide colourful patterns. The beauty of illustrated botanicals cannot be denied and it is what sets my designs apart from the rest. My designs are hand drawn, intricate, highly detailed and above all an intimate portrait of the chosen plant or flower. From something so delicate comes a robust and useful home textile which is luxurious and beautiful.

Last Christmas, I asked my sister, Juliette, to buy me some Abigail Borg cushions for my stripy sofa after seeing them in Liberty.  Lots of people comment on them because they are a little piece of art in themselves. I was instantly attracted by the deep, rich colours and bold, beautiful designs. I would love to paper a room in one of Abigail’s gorgeous wallpapers, or upholster a chair with one of her fabrics. Have a look…

Abigail Borg Polka Polka cushion

The gorgeous colours and hydrangea design of my Polka Polka cushion.

Abigail Borg Fritti cushion | Apartment Apothecary

All of Abgail’s designs seem to work together. I love the combination of my striped sofa, Polka Polka cushion and Fritti cushion.

Mr Chrysanth floral Wallpaper Abigail Borg

Gorgeous Mr Chrysanth wallpaper.

Abigail Borg Polka Polka wallpaper

My favourite design – Polka Polka wallpaper. I really like the complementary woodwork.

Abigail Borg Orange Fox wallpaper

I love the colours of the  Orange Fox fabric.

Abigail Borg floral cushions

Choose from a selection of beautifully made cushions that are made from a linen mix.

Which is your favourite print? X