Garden design

I’ve come to realise that garden design is incredibly difficult! Unlike interior design where I find it easy to visualise the end result and how to get to that point, I could not for the life of me figure out what we should do with the space that we have let alone how to get there. I know in vague terms what type of gardens I like as well as the type of planting, materials and colours. However, translating that to a real garden is very difficult!

In an ideal world we would commission a garden designer as I think that’s a very worthwhile investment and can potentially save money in the long run but it just very simply isn’t within our budget. We also don’t have the money to fill the garden with plants immediately; it’s going to be an ongoing project for years and hopefully a very satisfying one.

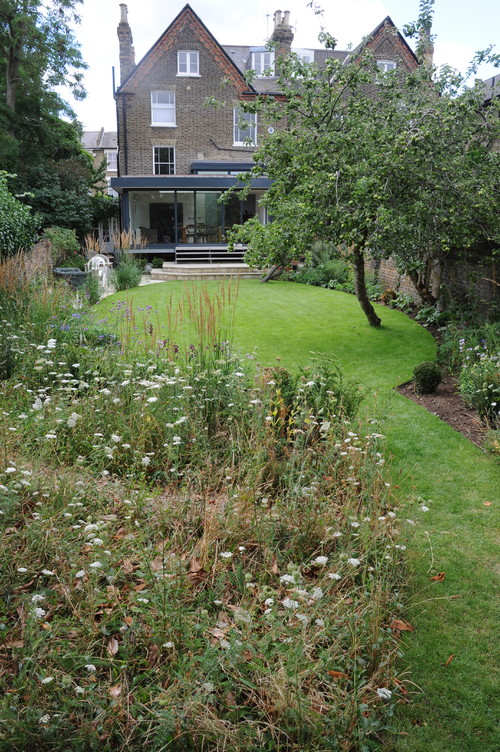
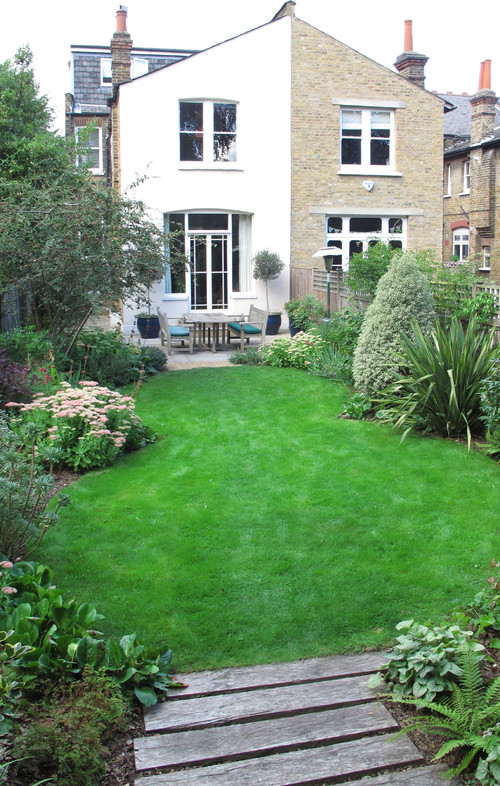
Instead, I have turned to some really great inspiration from Houzz, which is a really useful resource for both interior and garden design ideas. I got it into my head that an oval lawn would be a good idea as our garden is rectangular and the idea of a rectangular strip of lawn with two beds running up the sides does not appeal to me at all. Therefore, I typed ‘oval lawn’ into the search box and I found two really lovely examples of rectangular gardens that have been transformed using this shape. Our garden is quite a bit smaller than these examples and with our new deck there is no where near as much lawn as there was but using images like these is all about identifying what you like and making it work with the space that you have.

I really love the way the oval lawn gives this rectangular ‘London Country Garden’ a whole new shape and the beautiful natural planting is gorgeous. Perfectly manicured gardens with lots of structured planting and built in planters is not my bag so I will definitely aspire to create something more similar to this. I think it’s really clever the way the shape of the lawn leads your eye around the space and then off into the distance and instead of making it look smaller, which would be the assumption when making a lawn smaller, it actually creates so much more interest that the space feels and looks larger.


This next London garden is much more similar to our space in terms of length and narrowness. The double oval is a such a brilliant way of softening the edges of the rectangular garden and introducing lots of beautiful planting. I think this is a really good example of making a very basic space a real beauty without the expense of things like swanky new fencing but real attention on planting that can be done over years to come.

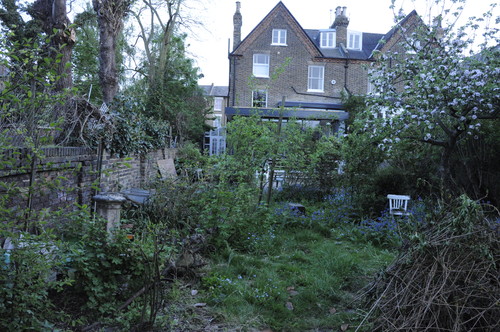
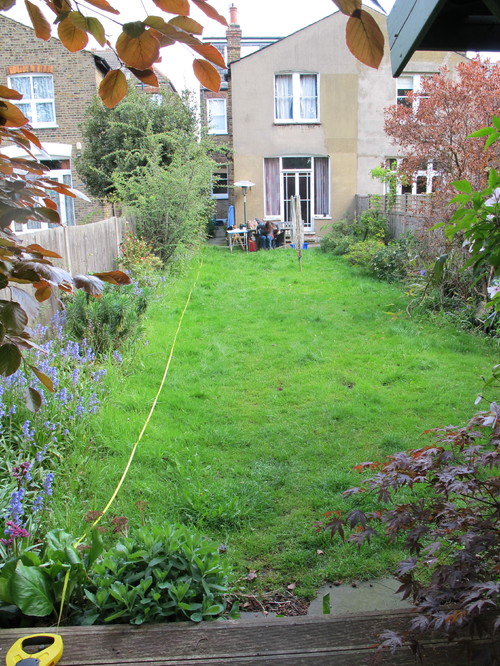
Yesterday I started the process of creating beds on the right hand side of the garden (the left can’t be done yet as the turf was only laid a week ago). I want to try to create the figure eight lawn of the above garden, which will hopefully soften the rectangular shape of the garden and detract attention away from the ugly stark fencing. I want to plant as much as possible over time to cover all of those horrid gravel boards and add as much height and texture to the beds of the garden as possible. We really do want to keep as much lawn as possible, especially whilst Mimi is so young as she loves the space so I hope this design will strike a good balance.

So this is where we started eight weeks ago.
This is where we’d got to a couple of weeks ago when we found out the deck boards were delayed so we got the house painted in the mean time.
Last week we laid some turf over the patch where the concrete had been. In an ideal world we would have re-turfed the whole garden but we just couldn’t make the garden a no-go zone for up to four weeks whilst the turf beds in. Hopefully we’ll be able to do that at some other point when not in lockdown. I’m focusing on the right hand side of the garden for now whilst the patch of turf takes root so I laid out some bits of wood to roughly mark out the beds I want to create..
My wood markers helped a lot actually!
A lot of digging later…
I’m really pleased with the shape it’s already given the garden just digging those beds on the right side! Mimi says it looks like a heart and Jules says I’ve made a bum in the garden so they’re both pleased… (sorry about the terrible photos but the scaffolding for the house painting is still up).

What do you think? I’ve ordered some evergreens that we can put in this year, as well as a few perennials for some colour over the summer. We’ll patch up the lawn as best we can with grass seed and we’ve decided to lay stone under the pergola but we won’t do that now as the last eight weeks under lockdown with all this upheaval has been a bit trying at times and we’d quite like some time to just sit and enjoy the garden for a while once the deck is finished.

Katy x

Transforming the exterior of a 1930s terrace

There are lots of 30s houses that have interesting features, pretty shapes, beautiful brickwork or quirky windows. However, our house has none of those; it is a pebble dash square box with uPVC windows. Therefore, the white paint we are using is intended to create a very plain backdrop that I can layer with pretty plants and additions that will be the focus of attention rather than the house itself.

This may sound funny but I want to transform this small 30s terrace to look more like a cottage! I don’t want to try to make it look smart or modern as I think this would end up in a horrid mess and highlight the ugliness of the house rather than disguising it. I want to add softness and prettiness that will work well with white walls and use touches of black for contrast as we have a black side access gate (a new addition that our neighbour organised) and the bottom band of the house will be painted black. Basically, I don’t want the house to look too newly decorated or ‘done up’ – I want it to look as unassuming as possible.

Scalloped Antique Rose Plant Pot | Blackened bronze door numbers | Swan neck light

Eventually we will add a new wooden front door that will be a lovely bright colour and the only other colour will come from flowers. I would like a climbing rose around the door and some very muted tiles leading to the door – something with a period feel but nothing too flashy or attention grabbing. I haven’t sourced any of these things yet as we don’t plan to do it yet as we focus on the back garden. I also don’t have it clear in my mind what type of fence we should have at the front but Jules would really like to build a large planter behind it into which we can put our wisteria arch (it’s currently in two separate horrible silver planters) and add flowers and plants that will be seen above the fence to grab the attention rather than the large uPCV window at the front of the house. Our wonderful wisteria arch already does a good job of drawing attention away from the house.

This is my general vision that I hope will work out in the future. Getting the house painted is the most important piece of the puzzle so that is going to be a great motivator to transform the exterior over the coming months. Do you think I will be able to make it look more cottage than pebble dash terrace?!

Katy x

Painting the exterior of our 1930s house

Two months ago we planned to spend around £1000 on removing the concrete in our garden and replacing it with some sort of seating area. It was just supposed to be the beginning of improving the exterior of our house. As it became clear that lockdown was here to stay and we realised how much money we could save this spring and summer our plans began to snowball. We decided to spend more and do more: we repositioned the garden fence and added a side access gate, Jules dedicated himself to building a big deck, we created a pergola in the garden and then there was a pause…

Basically, Jules has finished the deck base (which is the biggest part of the process) but we heard that the deck boards we ordered were delayed by three weeks. At the same time we were discussing the fact that we need to fix the guttering on our house and that led to the idea of painting the house at the same time (I’m not sure what the connection there was!). As soon as we saw this house it was something that we have been very keen to do – Jules in particular finds the brown pebbledash very depressing. In fact, I still look at the estate agent details of our house which led with a picture of the exterior and I can’t believe I clicked through to look at more!

The estate agent pic of our house

Anyhoo, it makes perfect sense to paint the house before the deck boards go on as the house will need to be scaffolded and putting that on top of a deck is tricky because of the weight plus the risk of paint spattering on it.

The brilliant Jimi from J A Whitney Building Contractors, who painted the interior of our house, is doing the paint job. The scaffolding will be erected today and we will get the guttering fixed at the same time as the drips will ruin the new deck at the back.

It is a very big expense at £2200, including scaffolding for three sides of the house. However, I think the impact of the change will be huge and it would be such a shame to live here for another five years, get it done then and look back and wish we’d done it now when we had the chance.

I’m really excited to see the beginnings of the paint job. I think I will paint the front door as a temporary measure as the white paint makes the old uPVC door look worse in a way.

I will write another post to show you what we will do to the house to soften the white and the plans for the front garden. I can’t believe how many changes we are making at this crazy time – it is certainly a good distraction!

Katy x

Transforming Mimi’s nursery into a child’s bedroom

Just before lockdown I had started making changes in Mimi’s room to make it work better for her age. When we moved to our house she was one and we basically moved her baby nursery from the flat straight into the house without making a single change – same colours, furniture, storage (you can see what the room looked like as soon as we moved in here and you can see Mimi’s nursery in our old flat here). That was fine for a while but since she turned three she has become much more interested in playing independently, imaginary play and dressing up (obsessed!) and her bedroom has become much more of a hub to play, which it never really had been as she previously just wanted to be wherever I was. Unfortunately, I got stuck mid way through making the changes when lockdown started so it’s all a bit of higgledy piggledy mess at the moment.

I made a big change by selling the large chest of drawers in her room to create space for toys. The drawers had been perfect for her nursery as it provided a changing area and so much great storage for nappies, baby clothes, blankets. However, it took up so much space and Mimi’s clothes are so much bigger now that we need some hanging space and she is at that stage that she wants to dress herself every day and she had started climbing up the drawers to get to the top ones (!).

We replaced the drawers that had been on the opposite wall for this second hand IKEA wardrobe. This works so much better as we now have hanging space and one large drawer at the bottom that Mimi can easily access. She is desperate for me to paint it pink and I definitely think she is right that it needs to be painted a colour as I’m not very keen on all this white.

As with any change like this it creates the decorating domino effect. We had removed shelves in the alcove to make way for the wardrobe and we now had a blank wall available for toy storage and play.

Literally a couple of weeks before lockdown I had started making changes to the space made available by selling the drawers. It is unfinished but it gives you an idea of what I want to create.

I bought a couple of inexpensive IKEA Trofast units with the money I got for selling the drawers to provide toy storage and I positioned them in such a way that it created a dressing up nook for Mimi as this is her absolute favourite pass time – ten changes of outfit a day is not unusual. I attached a street-find rail on to the bottom of the wall mounted unit (these wall drawers are mainly used for stuff I don’t want Mimi to be able to reach) for her costumes and I stuck a £5 mirror panel onto the wall. I had planned to paint them and organise them all but then lockdown came and priorities changed so it has stayed as it is.

We took down the picture ledges we had here for books to create more play space. Since lockdown I haven’t had the time to fill the holes or re-hang the picture and generally make this look better.

We removed the picture ledges we had used to store books as Mimi now reads more paperbacks and she loves getting a big pile of books from the library every week so the volume of books and the type was not really suitable for the ledges any longer; to get to one she would inevitably pull all the others down with it. We were very lucky to be gifted the perfect replacement book shelf from Tidy Books that is super slim and could be placed behind the bedroom door and make use of completely dead space.

I chose the plain kids wall bookshelf from Tidy Books and it is perfect for Mimi as she can access all the books herself and the clever design means she can take one book at a time without having to pull all the other books out at the same time.
It is super slim (the smallest I could find actually) and it is brilliant to make use of this dead space behind the bedroom door. It has helped us free up a whole wall that we had previously used for books.
Mimi really loves the shelf and it will definitely grow with her, which is ideal.

My real focus is thinking of ways to tie this space together and make it look more cohesive as it is all very thrown together at the moment. Obviously I need to to fill in holes left by shelves and move the large picture but I need to make decisions about possibly painting this wall and the furniture. At the moment I am deliberating over painting the whole room and the wooden furniture Slipper Satin to soften the feel of the room. The other alternative is to use Light Blue, which is the same colour as the door and skirting and I have left over paint, to do just half the wall, which would be a temporary fix during lockdown when we are so busy doing the garden. Alternatively, and this is Mimi’s preference, we could change it all and use a pink all the way round the room and change the wood work colour. Decisions, decisions.

This side of the room is my focus as soon as I have some time to dedicate to it.

I will write another blog post with some children’s bedrooms that I love to give you an idea of the changes I would like to make once life gets back to normal. Did anyone else get stuck in the middle of a decorating job when lockdown came?

Katy x

*Tidy Books very kindly gifted me their plain kids bookshelf

DIY wall panelling

I get loads and loads of ideas from Instagram and if I get stuck with what to do with one of my own rooms it is often a place I can find inspiration. I have been struggling to know how to finish off my spare room as it is such a small room with no space for a bedside table and the bed itself is a very small one with no headboard. It looks plain and unfinished as it is so I decided it needed a wall light above the bed and I started searching Instagram for examples of my favourite Le Klint scissor lamp and I found this:


View this post on Instagram


A post shared by MAIJU SAW / Maiju Saha (@maiju_saw) on

Not only do I love the lamp but look at that panelling! I was suddenly struck that an ideal way to add interest to the little single bed in our spare room would be some panelling. What do you think?


View this post on Instagram


A post shared by Katy Orme (@apartmentapothecary) on

I’ve always LOVED tongue and groove panelling but wood is expensive and it’s quite a lot of work to install so I got put off. And then I saw this very clever lady pull this DIY panelling off whilst her kids were at home on an INSET day!

It had never occurred to me that I could achieve this myself with just a few batons of wood and adhesive (check out Grace’s highlights to see how she did it). I have to say that I have never been mad keen on panelling, especially when added to new-builds, as it can look out of place or a bit fussy and pretentious. However, I really like the simplicity of these long panels like you can see here in Katy’s extended 30’s house:

I would really love to add some simple panelling to our spare room in due course (remember I am on a self-imposed ban on spending money inside our house this year as we focus on the outside!). I think it’s a great way to add interest and texture without spending too much money and by using different paint finishes you could create all sorts of different looks and effects. Adding in shelves and peg hooks is also a great idea as well as being practical. What do you think?

Katy x