An alternative Christmas table

Controversial, I know, but I’m not a big fan of red. I look at the way other people use it and I can see the beauty in it, but if I am surrounded by red, it makes me feel a bit anxious and seems to jar with the other colours in my home. So when it comes to Christmas, I end up filling my home with a colour that doesn’t make me happy, which is a bit of a shame. This year, I have decided not to let a single red decoration through the door and instead I am embracing the pastel pinks, blues and greens that I love, as well as my favourite white and a few hints of black. The only worry that I have is how to make that look Christmassy but as long as it looks beautiful and special, what does it matter?

I am very lucky to be sponsored this month by the wonderful Occa-Home and what I love most about this online store is that there is so much to choose from, no matter what your style, which is perfect for me because I am always combining different styles in my home. When I started to look for products to use for my Christmas table, I got lost in the all of the beautiful traditional tableware but then I was totally seduced by the gorgeous Scandinavian inspired designs that fit perfectly with my favourite pastel colours.

So, without further ado, here is my Christmas table, styled using lots of lovely goodies from Occa-Home and a few homemade bits by me…

An alternative Christmas table | Pastel Christmas table setting | How to make paint dipped baubles | Apartment Apothecary

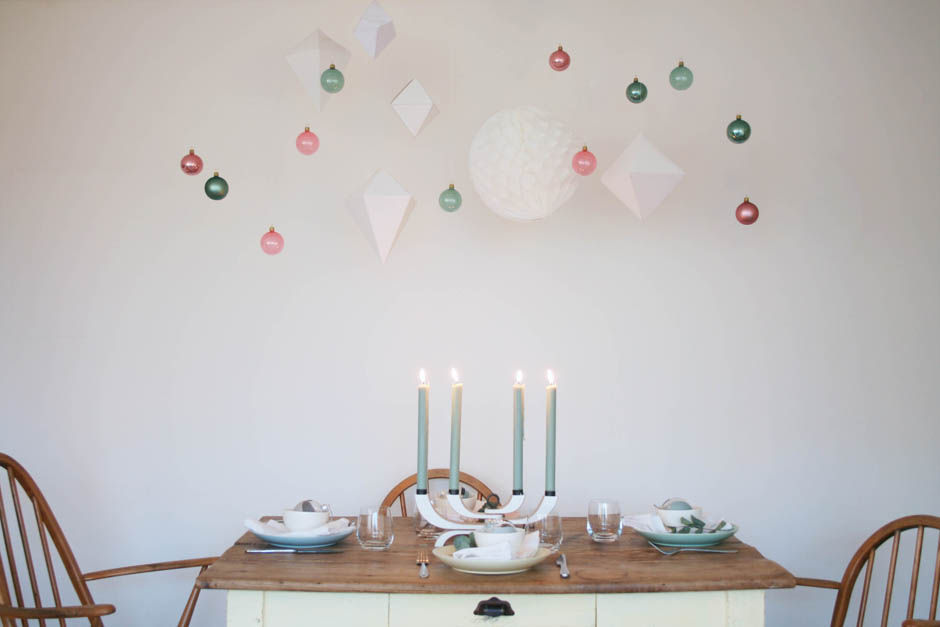
I selected the striking Design House Stockholm Nordic Light as the centrepiece for the table and instead of choosing white dinner candles I chose Eau de Nil coloured ones, which tie in with the other colours I have used. This candelabra is foldable and you can adjust it to create different shapes – I absolutely love it and it’s perfect for my alternative Christmas table.

An alternative Christmas table | Pastel Christmas table setting | How to make paint dipped baubles | Apartment Apothecary

The Bloomingville Olivia plates are blue and green and the Bloomingville Alberte plates are pink and yellow.

Whilst browsing Occa-Home I came across the Bloomingville Olivia plates and they are the perfect colours for my pastel theme. They can also be used on any other day of the year, which is an added bonus, but by placing these beautiful Linen Works napkins on them, a piece of Eucalyptus and the bowl, it instantly makes it look far more special than your average dinner time. There is so much beauty in the simplicity of this place setting and the soft colours.

I hung these co-ordinating baubles and a big pom pom from the ceiling to make the table feel more special and celebratory. I also made the octahedrons (just the technical name for the pretty 3D diamond shapes) from white card.

An alternative Christmas table | Pastel Christmas table setting | How to make paint dipped baubles | Apartment Apothecary

I love the soft blues, pinks, greens of my Christmas table.

I wanted to make some special name settings and I decided to make a personalised bauble, that could be taken away by guests after the meal – a bit like a wedding favour. The baubles fit perfectly in these gorgeous Design House Stockholm Dot bowls.

An alternative Christmas table | Pastel Christmas table setting | How to make paint dipped baubles | Apartment Apothecary

The napkins are beautiful classic linen made by Linen Works and the bowls are Design House Stockholm Blond Dot bowls.

I strung up the baubles, pom pom and diamonds with very fine white cotton and I love how it appears as though they are floating above the table.

An alternative Christmas table | Pastel Christmas table setting | How to make paint dipped baubles | Apartment Apothecary

I hung baubles and handmade diamonds from the ceiling.

To make my decorations:

1. Baubles:

If you’d like to have a go at making these personalised baubles, that I have used as name settings, all you have to do is buy a set of clear baubles and pour a very small amount of paint into them. Swirl the paint around to about half way up the bauble. Make sure you use a quick drying paint or chalk paint, as they do take a long time to dry. The key is to use as little paint as possible, and once you have swirled the paint to where you want it to be, place the bauble on an egg cup or glass and leave it there for about 48 hours – don’t disturb it (or put it on the radiator as I did which creates condensation and ruins the crisp line – very annoying mistake!). I used a Dymo tape machine to create the name labels, which just stick onto the bauble.

An alternative Christmas table | Pastel Christmas table setting | How to make paint dipped baubles | Apartment Apothecary

Place a piece of Eucalyptus and a personalised bauble on each place setting to make it special.

2. Octahedrons (diamonds)

The octahedrons are really easy to make. Jules very kindly drew out the shape for me on the computer and you can download the PDF here:  diamond octahedron. We have an A3 printer so printed them onto white card and used double sided tape to stick them together. I attached white cotton with tape inside the shape before I stuck them together.

I really hope you like my different take on a Christmas table. I had so much fun putting it together and not a bit of red in sight! I also love how using a specific colour palette can unify so many different styles – from mid-century dining chairs and a Victorian dining table to modern Scandinavian tableware.

What are you planning for your Christmas table?

Katy x

Disclosure: This post was written in collaboration with Occa-Home but the views and opinions are my own.
 

Blog love

Happy weekend everybody! It’s a been a busy week prepping for Christmas posts and I’m super excited to share my favourite post to date on Monday. I’ve set my self the challenge this year to decorate without any of the traditional reds, golds and greens and create an alternative Christmas table using pastel colours, which are my favourite at the moment. I was sent lots of lovely goodies from Occa-Home for the table so it’s extra special and I even made some octahedrons to decorate with – you will have to join me on Monday to find out what that’s all about!

For this weekend’s inspiration, I’ve included a couple of posts based on using non-traditoinal colours and materials to decorate with this Christmas, as well as some great DIY home ideas…

1. Wit and Delight

I love this blog post about how to create a Christmas garland, but using non-traditional colours and greens. I think the results are stunning…

Weekend Inspiration from Wit and delight | Apartment Apothecary

2. The Red Thread Blog

A bit of colour inspiration for decorating your home this Christmas in this lovely post. I love the colour palette Lisa has used…

Weekend Inspiration from The Red Thread blog| Apartment Apothecary

3. Poppytalk

Another gorgeous and inexpensive Christmas gift idea. I would love to receive one of these…

Weekend Inspiration from Poppytalk| Apartment Apothecary

4. Lapin Blu

Some home DIY inspiration from the creative Sarah-Lou whose gorgeous house was featured on Design Sponge last month. This blog post is about the potato printing she and her daughter did to create this wonderful Ferm Living-esque wall…

Weekend Inspiration from Lapin Blu | Apartment Apothecary

5. The Villa on Mount Pleasant

Lots of creative DIY ideas to be found in Tamsyn’s ‘new’ kitchen. Very inspiring for anyone renovating their own home, whatever your style…

Weekend Inspiration from The Villa on Mount Pleasant | Apartment Apothecary

So there’s my round up of what has inspired me this week and I hope it inspires you this weekend. Have a lovely one, whatever you are up to, and please do drop back on Monday for my pastel Christmas table.

Katy x


Styling the Seasons – December

It’s December – yay! Surely this is the month Styling the Seasons was made for! I’ve been so excited about this month’s edition because I worked on it during our wonderful Crafting the Seasons afternoon at Liberty; a partridge in a pear tree, all made from beautiful Liberty fabric.

Even though I’ve been looking forward to putting together this month’s styled surface, the reality didn’t quite work out as I had hoped. I spent all of Saturday in an absolute tizz shouting at myself, at Jules and threatening to throw my camera out of the window; I just couldn’t seem to get the ‘perfect’ shot even though it looked good in real life. I had set up my ‘tree’ on the hallway table that sees very little light and the table top is dark wood. The branches were in a very large glass vase and they were very tall, strewn with lights. I had placed a little stack of pressies at the bottom of the tree on the table. Hours later, I still couldn’t make it look nice on camera. I went for a dog walk and a drink, came home and tried again. Still no good shots. I began to question the styling, as well as the camera (and my rubbish photography skills!). I settled on the best of a bad batch of shots and felt thoroughly unsatisfied – I HATE that feeling, especially after working so hard on something that I’ve been really excited about.

I then sat down at about 10pm and went through some of November’s blog posts and shots on Instagram trying to choose my favourites for my November Review. I began to notice that my favourites all seemed to have something in common, which is a bright, fresh, white background, something I am more and more drawn to theses days – thank you Heather, Soumya, Emma and Teri for the inspiration! I got all excited (does that make me sad – it was Saturday night, after all?!) and realised I had to change my styled surface as it wasn’t balanced enough in height and colour – I needed a white background, surface and vase to allow the Liberty print to shine. I also added some nature at the bottom of the tree to balance out the branches and removed the presents. I have never been one for nature around the home but how could I not feel inspired by nearly all of the Styling the Seasons shots this month, as well as Lou’s #natureinthehome series, Emma’s #gatheredstyle and Sarah-Lou’s use of Eucalyptus around the home? So, I added the pine cones that I collected in the park the other day and wove Eucalyptus around some candle jars. I also moved the tree to the top of a cupboard in our sitting room after loving the same idea in Tamsyn’s November post.

The point is that I love this styling challenge because I learn so much from everybody who takes part and I hope I am able to pass that on to others, especially those who don’t have the confidence to style their homes in the way that they would like to. Here’s what I learnt from this little project:

– Don’t slog a dead horse! If something doesn’t feel or look right, change it up.

– Try to balance your styling in terms of height, texture and colour.

– Ask someone else’s opinion.

– Get inspiration from others and make their ideas your own.

– Don’t give up until you are happy with the results.

– Mess around with different options as you can find something that looks good by accident; the worse thing to do is just stare at it.

– Don’t spend your Saturday nights playing with stuffed birds and pears – it’s not cool.

Anyhoo, this is the end result of my Liberty print makes and December styling; it would make my year if it gives any of you a bit of inspiration…

Styling the Seasons - December | Apartment Apothecary

A partridge in a pear tree.

Styling the Seasons - December | Apartment Apothecary

My partridge is made from Hera and Mauverina Tana Lawn. I also added some Betsy print to the underside of the peg, after seeing Alexis do the same at Liberty (I’m going to make more of those to use everywhere!).

Styling the Seasons - December | Apartment Apothecary

I collected pine cones from the park, whilst walking Otto.

Styling the Seasons - December | Apartment Apothecary

My pears were made from my Liberty scraps box. This one is made from Phoebe and Wiltshire Tana Lawn.

Styling the Seasons - December | Apartment Apothecary

The jug is from Habitat.

Styling the Seasons - December | Apartment Apothecary

I wove small Eucalyptus stalks through twine tied to the top of jam jars for tea lights (I’m in love with the smell!).

Styling the Seasons - December | Apartment Apothecary

I am so excited to see everyone’s styled surfaces this month! Please do share yours on any social media, using the hashtag #stylingtheseasons and tag me and Lotts and Lots so we don’t miss them. Another huge thank you to the Liberty team for having us all and giving us the chance to play in Tana Lawn for hours – as if I needed an excuse!

Katy x


Tile coasters

I’ve got a bit of a thing about tiles. My friend, Agnes, bought me a set of old blue and white tiles from San Telmo market in Buenos Aires (if you are ever lucky enough to go there, you will never want to leave) and I absolutely love them. I never wanted to tile a wall with them, even though they would look gorgeous behind the bathroom or kitchen sink, because if I leave my home I’d have to leave them too, or go to all the effort of re-tiling. Instead, I’ve always used them as coasters either on the dining table for hot pots, or on the coffee table for cups and candles. A friend came over the other day and noticed the tiles and couldn’t believe she hadn’t thought of using pretty tiles as coasters herself – she has just finished tiling her bathroom floor with the most beautiful Fired Earth tiles and she has a few left over. So, I thought I’d share a few pics of how I use my tiles just in case you hadn’t thought of using them either. However, I have swapped my lovely Argentinean tiles and a couple of tiles from Morocco, for some cheap tiles from the local tile shop, to show you that inexpensive, new tiles can look nice, too, as I know not everybody has a vintage collection;)

Using tiles as coasters | Apartment Apothecary

All you need to do is buy some surface protectors and add them to each corner of the tiles. That way they won’t scratch your dining table, coffee table, bedside table, kitchen worktop or sideboard. The surface protector pads only cost a couple of pounds.

Surface protectors

Add surface protectors to the bottom of your tiles to use them as coasters.

Dot the tiles around your home and not only do they serve a practical purpose but they also add decorative detail that lifts any surface. I have them on my coffee table for drinks and candles, dining table for hot pots, bedside table for candles and on my dressing table for my hair straighteners (the best use for them!!).

Using tiles as coasters | Apartment Apothecary

I always have a few tiles on my coffee table (my mum’s old school trunk) to protect it from candles and hot drinks. This is the Tangier Blue tile that you can buy here.

Using tiles as coasters | Apartment Apothecary

BEST use of a tile EVER!

Using tiles as coasters | Apartment Apothecary

Have a couple of tiles on your dining table for hot pots.

Using tiles as coasters | Apartment Apothecary

Antic Blanco Delft tile that you can buy here.

Looking to give some inexpensive gifts this Christmas? What about a stack of tile coasters? This stack cost £4 and took about three seconds to add the surface protector pads…

Inexpensive Christmas present | Apartment Apothecary

A stack of tiles would make a lovely, inexpensive Christmas present.

Or, what about these beautiful Mexican tiles from Milagros, which cost 46p or 75p each! What a perfect present instead of another box of boring chocolates…

Using tiles as coasters | Apartment Apothecary

Katy x


Ask Apartment Apothecary – homemade Christmas presents

Today’s AAA is for Becky, who got in touch to ask for homemade Christmas present ideas. She finally has time to be more creative and has begun projects that she has wanted to do for years. Becky now feels inspired to make some Christmas presents, which are more personal and also have the added bonus of saving money. I definitely want to make some presents myself this year, so I really enjoyed looking for ideas that I will use too. All of these craft projects do not involve a sewing machine, as Becky doesn’t have one, so anyone can do them.

Here’s what I found…

Small token presents for neighbours, colleagues, family friends

There are always groups of people that I want to give presents to at Christmas time, whether it be neighbours, your child’s teachers, colleagues or distant cousins, but to do so would cost an absolute fortune.  I am in love with this idea though; so cheap, so easy, so quick and what a lovely thing to be given, perfect for the festive season when you entertain in your home to make it smell lovely and Christmassy. Find the full tutorial on Dandee and see the ones I made here.

Homemade Christmas presents | Apartment Apothecary

Homemade Christmas presents | Apartment Apothecary

Image: Dandee

Or, what about these lovely DIY candles and you could make pretty labels for them? Perfect to hand out as small gifts. The tutorial is on Style Me Pretty.

Hand printed cushions or bedlinen

This is a really lovely idea, that is perfect for the novice crafter but can have a big impact. Buy a cheap, plain cushion cover, bedlinen, tea towels or napkins and hand print any pattern you desire – polka dots, scallops, triangles. You can even use a potato or make a stamp with a piece of lino and a lino cutter. I think I’m going to print a few cushion covers for presents this year. This tutorial by Oh No Rachio is a good place to start or here at Creature Comforts blog where she uses the rubber tip of a pencil (something that I have done before and it is super easy).

Homemade Christmas presents | Apartment Apothecary

Image: Poppytalk

Personalised crockery

There are so many ways that you can personalise crockery or glassware to make them the ideal Christmas present. There is a great tutorial on Garland of Grace.

Fabric flower pots

I find it really difficult to find pretty plant pots and this craft idea is really easy and the results are very effective. You can buy plain terracotta plant pots from your local garden centre very cheaply and then use fabric to cover them. Find a full tutorial here.

Painted furniture

What about personalising a piece of furniture for a present? This could either be an antique piece that needs a good paint job or something as simple as an Ikea stool. Either way, this is relatively cheap, fun to do and shows a lot more thought than another pair of slippers (or whatever you always receive at Christmas).

Clay bowls

Imagine how creative you could get with air dry clay! You could stamp patterns onto them, etch words, use different paint effects and what a lovely gift these DIY bowls would make. The tutorial is over on Alice and Lois.

Keepsake board

This no-sew keepsake or notice board would make a lovely present and is relatively easy to make. I would really enjoy choosing different fabrics to make these. Find the tutorial on the Liberty blog.

Mason jar light

I think this would make a really unique gift and wow whoever you gave it to when you tell them you made it yourself. There’s a good tutorial on in.gredients and I noticed the other day when I was in Heals that they are now selling gorgeous combinations of flex and light fittingsas well as Edison bulbs.

Homemade Christmas presents | Apartment Apothecary

Image: Woon blog

These are just a few possibilities and if you want more inspiration head over to my craft projects board on Pinterest. Have you got any good homemade Christmas gift ideas? Please do share them in the comments section below.

I hope some of these projects will inspire you, Becky!

Katy x

P.S. If you have a craft or interiors related question, or any sort of design dilemma, please do post it on my Facebook wall or email me katy@18.200.196.112 and I will be happy to help.

Update

I absolutely love it when readers get in touch to tell me they have made something they have seen on my blog. I love it even more when they send me a pic of their make. This is Helen’s photo of the fig-secented candles she made using the tutorial on the gorgeous Really Pretty Useful blog. These are going to be one of my first makes of 2015 – thank you so much, Helen, for the inspiration x

image1