Liberty sewing project

When I receive an email from Liberty asking me to do a guest post, I always do a little leap for joy. For past guest posts I have made advent calendar bunting and a travel highchair and this time I decided to make a summer project with the beautiful Liberty fabric I was sent. I have had a bare deckchair frame for three years hanging around in my hallway cupboard. Every year I promise myself that I will bring it back to life and this year I have finally got round to it!

I oiled the frame and made a simple, plain sling. I then used the gorgeous Thorpe print fabric to make a headrest cushion. If you have a deck chair, you need to make one of these! It makes the chair sooooo much more comfortable.

I do hope you hop over to the Liberty craft blog to check out my tutorial. Here’s a sneak peek…

IMG_2047

Happy lounging!

Katy x


Up-cycling an eBay find

I have been asked to enter the best competition EVER!  I’ve been given £100 by Direct Blinds to buy and renovate a piece of furniture of my choice.  Amazing.

I want you to see the ‘before’ shot of the piece I have bought from eBay for £30. I wanted to buy something that I need so this is going to be perfect in my new home office for craft storage. It’s a great shape (love the legs), I like the glass doors and it’s a very practical size. However, in this space, particularly as it is next to the window, it seems to suck every ounce of light from the room. If it were in the sitting room or hallway, I might keep it as it is but it is not the lovely teak you might think it is from the photos; it is actually quite a nasty dark, orangey veneer.

So, it needs to be lightened, a little dash of character and some pegboard to go above the cabinet. This is going to be storage heaven!

Entries close on July 15th so check back to see what the piece will eventually look like.

Up-cycling an eBay find www.apartmentapothecary.com

Up-cycling an eBay find www.apartmentapothecary.com

I’d love to know what you would do to this piece too! Leave me a comment 😉

Katy x


Topps Tiles competition

I love being asked to enter competitions that involve being given resources that I would never usually buy or pick myself as it forces me to think in a different way and come up with new ideas. This time round, Topps Tiles sent me some mosaic tiles and glue and asked me to craft an item using the tiles. This was pretty tricky as I wouldn’t have chosen the colours that I was sent so I had to think hard. Here’s what I came up with…

How to make a mosaic tiled tray www.apartmentapothecary.com

I was sent two sheets of tiles and a couple of bottles of mosaic tile glue, which is pretty great stuff.

How to make a mosaic tiled tray www.apartmentapothecary.com

I decided to mosaic the base of a plain, wooden tray. I started by painting the tray with some left over Annie Sloan Antoinette pink chalk paint.

I picked off all of the baby pink tiles from the brownish sheet and combined them with the white ones to make a pastel pink garden drinks tray.

How to make a mosaic tiled tray www.apartmentapothecary.com

All you have to do with the mosaic tile glue is apply a coat to the base of the tile, wait a few seconds and then stick it straight onto your surface. No need for messy grout!

How to make a mosaic tiled tray www.apartmentapothecary.com

I decided to stick the tiles close together to form a smooth surface and no need for grouting.

How to make a mosaic tiled tray www.apartmentapothecary.com

All done and ready for pretty pink summer drinks and strawberries on my roof terrace!

How to make a mosaic tiled tray www.apartmentapothecary.com

How to make a mosaic tiled tray www.apartmentapothecary.com

What would you have made?

Thank you to Topps Tiles for the resources 🙂

Katy x

Painting MDF floor

During the Easter bank holiday, Jules and I committed to staying at home for three days whilst the rest of the family went down to Devon to celebrate (they took Otto, too) so that we could paint our floors. It was a mammoth job that covered our living room, kitchen and hallway that were all previously carpeted (except the kitchen where lino was laid). We had decided to buy a beautiful oak floor but after a £4000 quote we decided against it as we don’t plan on staying in this flat forever and other costs sprung up that took priority. However, it was important we got rid of the carpet, that I have always hated, as I can cope with nice, new, clean carpet but old, dirty, wrecked carpet is too much to bear (Otto is to blame for the wreckage!).

So, I impulsively ripped up the carpet in the hallway, saw that good quality MDF boards lay beneath, did a paint test and it worked! Decision made. Today, I want to share with you how we did it just in case anyone else out there is considering it to save themselves the cost of a new floor.

Sorry about the rubbish photos – when your hands are covered in paint it’s not very easy to take good shots.

Step one: Removing all furniture

This is the old carpet (shamefully dirty where the sofa was!). We had to put every single bit of furniture into the two bedrooms for the three days it took to paint.

Painting an MDF floor www.apartmentapothecary.com

Step two: Remove carpet and underlay

Painting an MDF floor www.apartmentapothecary.com

Step three: Lightly sand and hoover floor thoroughly

Doing a really light sand – we used a hand held orbital sander – helps the primer adhere to the MDF but it’s not entirely necessary.

Painting an MDF floor www.apartmentapothecary.com

Step four: Tape skirting boards and do two coats of MDF sealer/primer

It’s really important to use a sealer on MDF as if it absorbs water it swells. We used Johnstones MDF White Primerwhich acts as a sealer and primer. You have to wait about two hours between each coat as it is a quick drying paint.

Painting an MDF floor www.apartmentapothecary.com

Step five: Three coats of floor paint

Ideally I would have like to have painted the floor white but with a lot of traffic and a very muddy dog we decided it would be far more practical to go for a pale grey as this would disguise some of the dirt. We used International Floor Paint Palest Grey. This is a quick drying gloss paint so we only had to wait six hours between each coat (during which time we had to stay in the bedroom – a lot of box sets were watched!).

Painting an MDF floor www.apartmentapothecary.com

Step six: Wait three to five days to put your furniture back on the floor

We had to live in the bedroom for three more days, which wasn’t that fun, but worth it for the amount of money we saved.

Painting an MDF floor www.apartmentapothecary.com

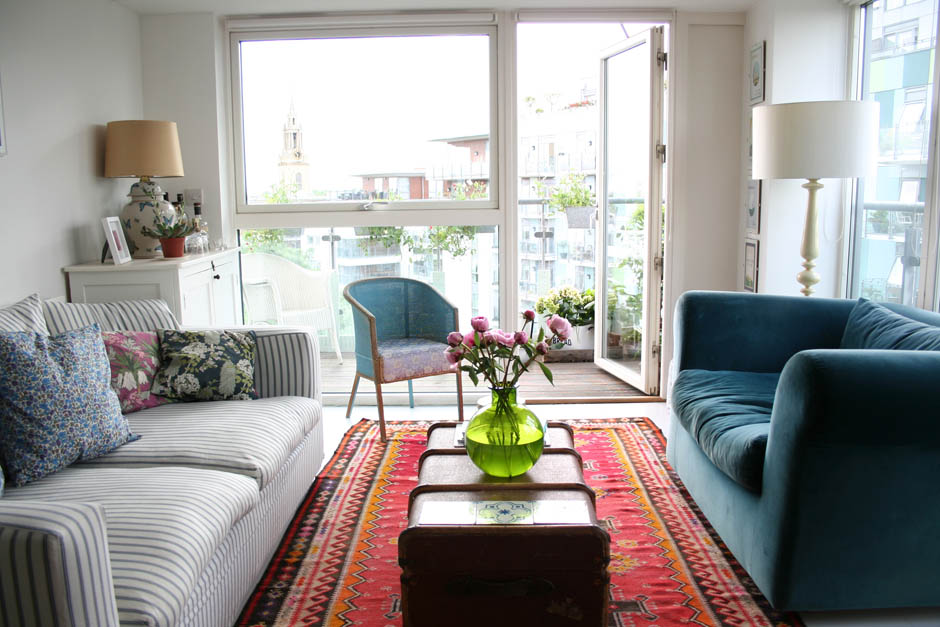
I had always planned to buy a rug for the living room, which was easier said than done as I found it very difficult to find the perfect rug. However, after HOURS of trawling Etsy I finally found the perfect rug! I searched for ‘vintage Kilim rugs’ and they have an amazing selection.

Painting an MDF floor www.apartmentapothecary.com

And here is the finished floor with the rug…

Painting an MDF floor www.apartmentapothecary.com

Painting an MDF floor www.apartmentapothecary.com

Painting an MDF floor www.apartmentapothecary.com

I will show you the hallway in a separate post as it is STILL not finished as I’m STILL chasing the elusive perfect runner rug! However, for the last couple of months the new floor has been brilliant: hard wearing, easy to clean, water resistant, perfect blank canvas and makes the space feel so much bigger and brighter. Also, painitng it grey rather than white was definitely the right call as it does disguise a lot of the dirt. BOOM!

Katy x


Annie Sloan chalk paint

Have you discovered Annie Sloan chalk paint yet? If not, you’re in for a treat.

I was very kindly invited to an Annie Sloan paint workshop, run by Rigby and Mac, to learn how to use the paint and create some of the effects it is capable of. Lucy, who ran the workshop, was totally wonderful, warm and knowledgable and there was a lovely group of other people there too, including the 2 Lovely Gays – love them. Located in Dulwich, South East London, in a beautiful light filled industrial building (with a wondrous cafe called Volcano for lunch) the workshop was a very happy way to spend a Saturday morning.

The key things I learnt and love about the paint:

– No need to prime or sand your surface (AMAZING!)

– Can be applied to a variety of surfaces including: glass, metal, varnished wood, laminate (oh yes!)

– It does not smell and dries very quickly so no need to paint outside

– It can be watered down or mixed with other colours easily.

My mind is still reeling from the fact that I now have the potential to paint dark, varnished wood with no preparation whatsoever. I also feel a bit aggrieved that I spent two days of my life painting internal doors with five coats of primer and gloss paint when I could have used a couple of coats of this and some wax. Gutted.

Rigby and Mac Annie Sloan chalk paint workshop www.apartmentapothecary.com

The Annie Sloan paints come in a really beautiful range of colours that are stocked at Rigby and Mac and sold online.

Rigby and Mac Annie Sloan chalk paint workshop www.apartmentapothecary.com

One of my favourite colours that we worked with: Aubusson.

Rigby and Mac Annie Sloan chalk paint workshop www.apartmentapothecary.com

We were able to try lots of the paints, waxes and get inspiration from the Annie Sloan books.

Rigby and Mac Annie Sloan chalk paint workshop www.apartmentapothecary.com

We worked on strips of wood to learn the different effects. I think everyone enjoyed learning how to use the gold leaf the most – here it has been applied over English Yellow.

 Using the paint at home…

So, when I got home I was very excited to give it a go. I haven’t currently got any furniture that I want to paint so I decided to give a little set of Ikea Moppe drawers a makeover. I bought Antoinette pink, brass leaf (that actually looks gold in most lights), gold size and soft wax from Rigby and Mac. You will also need a paint brush, scissors and a j-cloth.

Annie Sloan chalk paint Ikea hack www.apartmentapothecary.com

1. Paint the surface – if you find the paint too thick you can water it down. You may need two coats, depending on what you are painting.

Annie Sloan chalk paint Ikea hack www.apartmentapothecary.com

2. Cut circles of the brass leaf (that looks gold) with scissors – a little tricky so you need to be careful.

Annie Sloan chalk paint Ikea hack www.apartmentapothecary.com

3. Paint some gold size on to where you want to stick your brass leaf. Allow it to dry a little until it is tacky.

Annie Sloan chalk paint Ikea hack www.apartmentapothecary.com

4. Very carefully, place your brass leaf dot onto the gold size once it is tacky and with a dry brush ensure it has adhered to the surface.

Annie Sloan chalk paint Ikea hack www.apartmentapothecary.com

5. Use a j-cloth to apply a coat of the soft wax. The more you buff the wax, the more glossy it will become. The wax also protects the paints and brass leaf from scuffing and stains.

Annie Sloan chalk paint Ikea hack www.apartmentapothecary.com

The transformation is complete! It was hard to catch the reflective dots from this angle but in real life it’s so pretty!

Annie Sloan chalk paint Ikea hack www.apartmentapothecary.com

These little drawers are perfect for lots of crafty bits and bobs.

Annie Sloan chalk paint Ikea hack www.apartmentapothecary.com

The perfect addition to my craft room.

I can not wait to try the paint out on something more substantial. Thank you again to Rigby and Mac for the great workshop; is it too much to say this paint is life changing?!

Katy x