Embroidered Liberty print napkins

I’m off to Germany this morning for the Designers’ Open and I was thinking about what I could take on the plane to keep me occupied. Embroidery came to mind and I remembered a tutorial that I made and Katharine Peachey shot for me ages and ages ago. The tutorial was originally shared over at 91 Magazine but I thought it would be nice to share it here, too, as it is one of my favourites. All you need is an old sheet to make these sweet embroidered napkins so it may be a good weekend project for you, especially now it is colder and the evenings are darker – all the more time for embroidery!

This was my first ever embroidery project so I practised by using a design by Jenny Hart for the Kin Community and I changed the colours to the faded blues of my beloved Hydrangeas. I used their video tutorials to learn how to do French Knots and I found them so helpful whilst learning basic stitches. Once I had gained a bit of confidence and got inspired I designed the other napkin motifs myself.
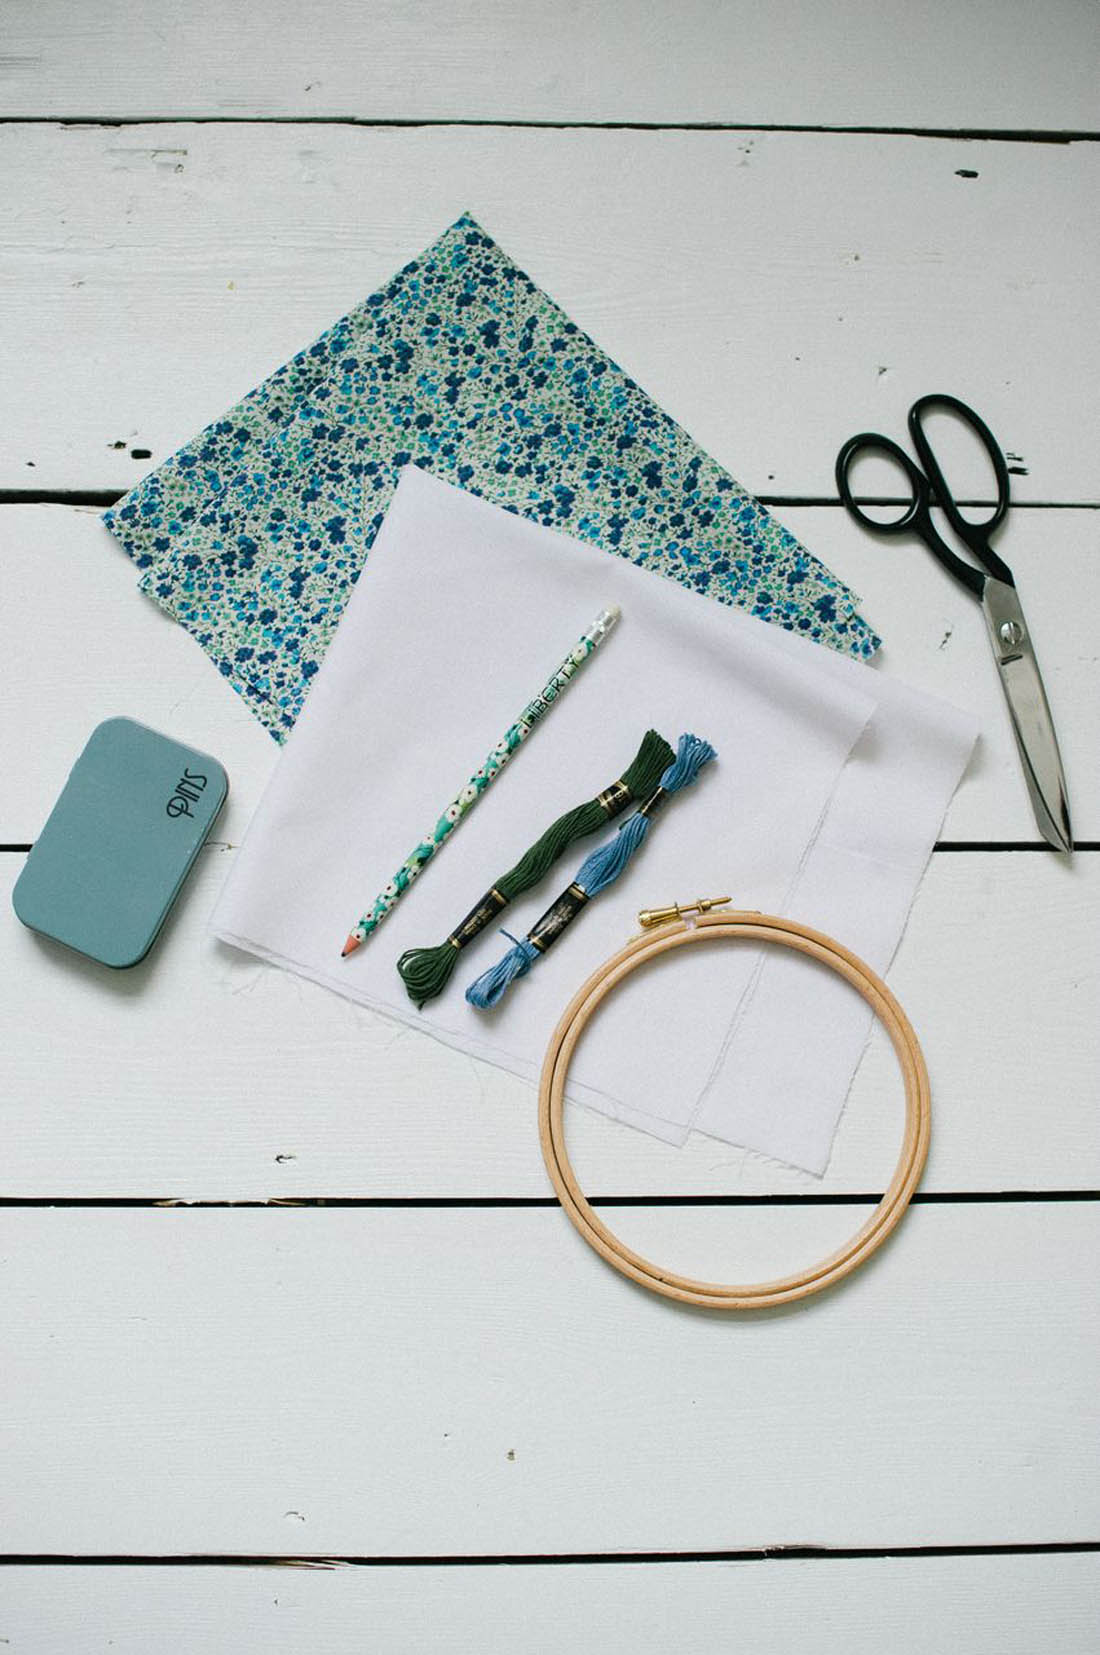
How to make embroidered napkins | Vintage style Liberty print napkins tutorial | Quick and easy sewing project | Apartment Apothecary

You will need:

A set of four plain napkins OR 40cm x 40cm pieces of white cotton fabric for each napkin (or even an old cotton bed sheet)

Four pieces of Tana Lawn Liberty print of an equal size to your napkins/white cotton

Embroidery hoop, needle and floss in a variety of colours

Sewing machine and thread

Fabric scissors and pins

Pencil

Embroidered napkin tutorial | Liberty print napkins | Sewing tutorial | Photos by KatharinePeachey.co.uk

You will need

Step by step:

1. If you are recycling old napkins, then press well and use fabric scissors to cut four matching pieces of Liberty print fabric – these will form the back of each napkin. If you are using white cotton, cut pieces of this and your Liberty fabric to approx. 40cm x 40cm.

Embroidered napkin tutorial | Liberty print napkins | Sewing tutorial | Photos by KatharinePeachey.co.uk

Step 1

2. Get creative! Find inspiration from your favourite flower or floral fabric to help design a floral motif for each napkin. Draw your embroidery design with pencil onto the left hand corner of each piece of white cotton, or wherever you would like to sew it. You can do a different design on each napkin or the same in different colours.
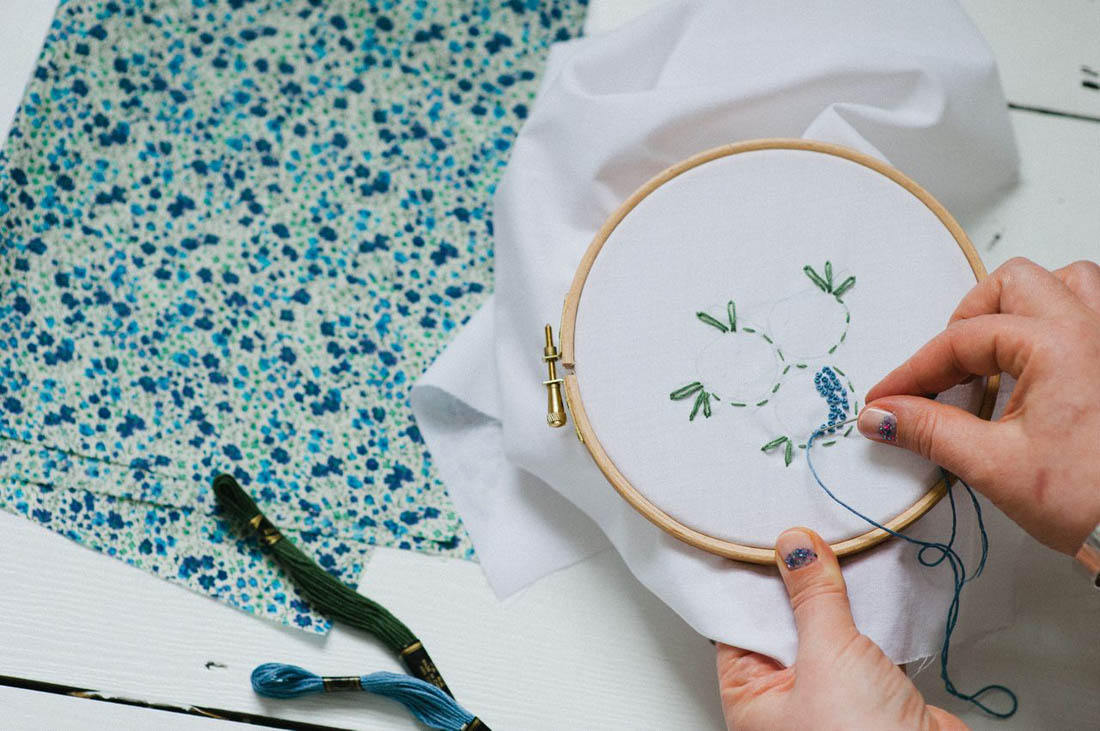
Embroidered napkin tutorial | Liberty print napkins | Sewing tutorial | Photos by KatharinePeachey.co.uk

Step 2

3. Decide which embroidery stitch best suits the petals and leaves of each flower. If you are unsure about embroidery stitches, try watching video tutorials online. It’s much easier than it looks, I promise! I used ‘French Knots’ for the petals of this design and a ‘Lazy Daisy’ stitch for the leaves. I took inspiration from one of my favourite flowers, the Hydrangea, so used a variety of faded blues.

Embroidered napkin tutorial | Liberty print napkins | Sewing tutorial | Photos by KatharinePeachey.co.uk

Step 3

4. Once you have completed your design, pin the white cotton fabric and Liberty fabric right sides together.

How to make embroidered napkins | Vintage style Liberty print napkins tutorial | Quick and easy sewing project | Apartment Apothecary

Step 4

5. Sew the two pieces of fabric together leaving a 5cm gap open on one side so you can turn it inside out. Turn inside out and press the napkin well. Finally, using a contrasting thread, top stitch around all four sides of the napkin, ensuring to sew up the 5cm gap.

How to make embroidered napkins | Vintage style Liberty print napkins tutorial | Quick and easy sewing project | Apartment Apothecary

Step 5

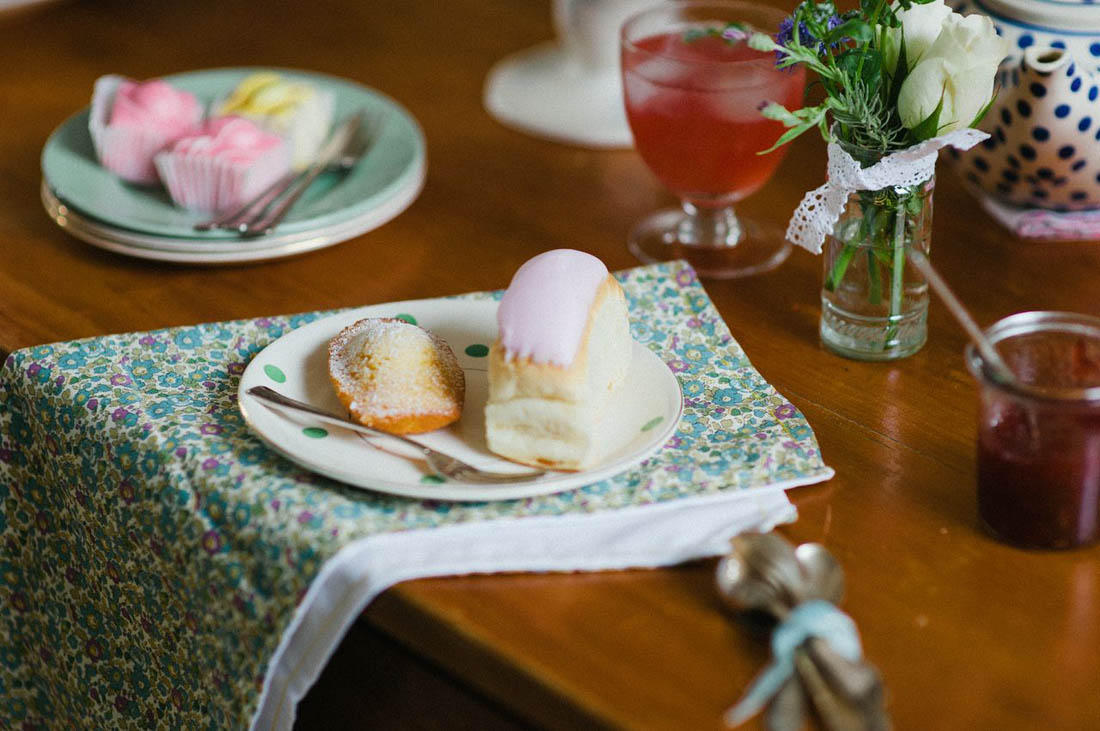
Aren’t they pretty? Definitely one of my most treasured makes because of the time that went into that embroidery.

Embroidered napkin tutorial | Liberty print napkins | Sewing tutorial | Photos by KatharinePeachey.co.uk

How to make embroidered napkins | Vintage style Liberty print napkins tutorial | Quick and easy sewing project | Apartment Apothecary

Have you got any sewing projects planned? Happy weekend!

Katy x

*All images by Katharine Peachey.

DIY air dry clay hanging planter

So today’s craft project wasn’t really intended for the blog (it was more of an experiment) but I took some step by step photos just in case it turned out ok. I’ve been wanting to make another hanging planter for ages and had thought about trying my hand at macrame but I got all over ambitious and decided to make my own planter instead.

I’ve been wanting to try out air dry clay since I saw this project a few years ago so I suppose this was my inspiration along with my love of a hanging planter (see my other planters here and here).

Anyhoo, I learnt a lot from this first project and although the planter did turn out ok, there are things I could improve next time – I’ll tell you about them as I go along. These are brilliant to make to brighten a corner, for herbs in the kitchen or even for lovely homemade gifts (Christmas gifts – yup, I said it).

DIY air dry clay hanging planter tutorial | Pegboard | Home office | Craft room

You will need:

FYI, I have no ‘proper’ equipment i.e. moulding knife.

Air dry clay (I used about 500g for my pot, which is £2’s worth)

– Rolling pin

– Knife

– Template (I used a plant pot)

– Ruler

– Protection for the surface you work on (parchment paper worked well)

– Bowl of water

– Cord

– Kebab stick

– Sand paper

– Scissors

– Paint ( I used white gloss spray paint but you can use any paint you have at home or just a small sample pot), decorator’s tape, cardboard box – if decorating

Step by step

Step 1 – Roll out all of your clay evenly to about 70mm thickness. Cut out a disc for the bottom of the planter using a template. I had a plant in mind for my planter so I used the top of its pot as a template, which measured 9cm in diameter.

DIY air dry clay hanging planter tutorial | Apartment Apothecary

Step 2 – Cut out a rectangular collar, which will form the sides of the pot. Mine measured 9 x 27cm. Make sure there is o.5cm overlap where the collar will join together.

DIY air dry clay hanging planter tutorial | Apartment Apothecary

Step 3 – Using your hands roll out a ‘snake’ of clay the same length as your collar and about 70mm thick.

DIY air dry clay hanging planter tutorial | Apartment Apothecary

Step 4 – Place the disc on a flat surface and wrap your collar around it (don’t place it on top of the disc).

Step 5 – Using your fingers smooth the collar together and use some water to make it stick.

Step 6 – Place the ‘snake’ of clay around the inside of the pot where the disc and collar meet.

DIY air dry clay hanging planter tutorial | Apartment Apothecary

Step 7 – Using your fingers and water (you’ll need to have short nails – this is where better crafters than I would use a moulding knife) smooth the ‘snake’ into the join. At this point the sharp, crisp lines of my pot quickly disappeared as I had to manhandle it so much – hence the need for a proper moulding knife. I should have trimmed the top of my pot at this point as they became a bit wonky, but I’ll know for next time.

DIY air dry clay hanging planter tutorial | Apartment Apothecary

Step 8 – Stick a kebab stick, or anything similar, through the four sides of the planter to create holes for the cords that it will hang from. Wiggle the stick around so that the hole is big enough for your cord.

DIY air dry clay hanging planter tutorial | Apartment Apothecary

Leave your pot to dry for 2-3 days. There really is no point rushing this stage if you want it to last.

Decorating

You can leave your pot undecorated or you can varnish it, which is advised if it is going to come into contact with water. I decided to spray paint mine with some white gloss paint that I bought for another project. I have so many beautiful half glazed pots, cups and vases so I decided to try to achieve anywhere close to that look. I’m pretty pleased with how it turned out actually, although it is pretty difficult to see in theses pics – I really like the idea of using a pastel blue, pink, green or grey, too.

Step 9 – Lightly sand your pot once it is dry to remove any bumpy edges. If you want to try the half glazed look use decorator’s tape to cover the bottom half of the bottom.

Step 10 – Place your pot in a cardboard box, if you are using spray paint, and take it outside to spray. Do many thin layers, allowing each one to dry before starting another.

Step 11 – Cut four pieces of cord of equal length.

DIY air dry clay hanging planter tutorial | Apartment Apothecary

Step 12 – Thread the cord through the holes and tie a knot on the inside of the pot. If you have difficulty getting your cord through the holes burn the ends of the cord so that it melts hard and won’t fray as you thread it. Tie all four lengths of cord into a knot at the top.

DIY air dry clay hanging planter tutorial | Apartment Apothecary

If you look really closely you can see the half glaze effect – it looks great in real life, trust me!

Half glaze

I decided to hang mine on my pegboard to brighten up my workspace.

Pegboard and planter

Pegboard

DIY air dry clay hanging planter tutorial | Pegboard | Home office | Craft room

I like this air dry clay game…I’m thinking Christmas could become air dry clay filled 😉

Katy x

P.S. If you would LOVE your own hanging planter without getting crafty I can help with that, too. Check out these beauties from my shop

DIY origami lampshade

I have loads of wallpaper remnants at home and I often think about how to use them so I was excited to be asked by Voyage Decoration to join in with their #VoyageWallArtChallenge (search the hashtag to see the other blogger projects). The challenge was to get creative with their beautiful wallpaper and I chose the Jayin wallpaper in the pacific colour way, which is part of their latest collection, Iridescence. There are so many different wallpaper crafts and DIY’s as it is such a versatile material but I eventually settled on making an origami lampshade as I thought this would complement the inspiration behind the Iridescence collection, which is based on the dramatic effect that light can have on colour.

Before you say it, I know this isn’t technically origami as it involves string and tape but this makes it so much easier for the origami beginners amongst us (me being number 1 in that group!).

How to make an origami lampshade out of wallpaper | Quick and simple wallpaper crafts | Apartment Apothecary

You will need:

– Wallpaper (by the way, Voyage sell their wallpaper by the metre) 29.5 cm x 77.5 cm

– Pencil

– Scissors

– Cord or twine

– Strong tape

– Hole punch

How to make an origami lampshade out of wallpaper | Quick and simple wallpaper crafts | Apartment Apothecary

Step 1

Cut the wallpaper to 29.5cm x 77.5 cm. On the reverse of the wallpaper draw out folding lines. You need thirteen vertical lines spaced 5.5cm apart (black). You then need to add diagonal lines to the left (pink) and diagonal lines to the right (aqua). Follow the pattern below.

How to make an origami lampshade out of wallpaper | Quick and simple wallpaper crafts | Apartment Apothecary

Step 2

Fold the vertical lines first (black) and then fold the first set of diagonal lines (pink) and then the second set of diagonal lines (aqua). You can score the lines first for ease and precision. You need to always fold the paper in on itself so that the right side is always facing out.

How to make an origami lampshade out of wallpaper | Quick and simple wallpaper crafts | Apartment Apothecary

Step 3

Punch holes along the top edge of the wallpaper length. Thread them with twine.

How to make an origami lampshade out of wallpaper | Quick and simple wallpaper crafts | Apartment Apothecary

Step 4

Use strong tape (I have used coloured washi tape just so you can see it) to fix the two ends of the shade together. You must ensure that you overlap the two ends by 11cm so that the diamond pattern is retained.

How to make an origami lampshade out of wallpaper | Quick and simple wallpaper crafts | Apartment Apothecary

Step 5

Stand the shade on its bottom and begin to the pull the two ends of the twine to draw the top of the shade together.

How to make an origami lampshade out of wallpaper | Quick and simple wallpaper crafts | Apartment Apothecary

Step 6

Pull the twine tight, ensuring the shade folds in the right places. Don’t tie it up yet as the flex and bulb need to be put through the top of the shade.

How to make an origami lampshade out of wallpaper | Quick and simple wallpaper crafts | Apartment Apothecary

Step 7

Place the flex through the top of the shade and then screw in a cold bulb (you can’t use a hot bulb as it will be too close to the paper). Now you can tighten the twine at the top of the shade and tie it together.

How to make an origami lampshade out of wallpaper | Quick and simple wallpaper crafts | Apartment Apothecary

You can do the same to the bottom of the shade as you did to the top to make it more of a globe or you can leave it open.

How to make an origami lampshade out of wallpaper | Quick and simple wallpaper crafts | Apartment Apothecary

Switch your bulb on and you are done!

How to make an origami lampshade out of wallpaper | Quick and simple wallpaper crafts | Apartment Apothecary

This is such a quick and easy craft to do and it really does look quite special when the light is switched on. Thanks to Voyage Decoration for the creative challenge and their beautiful wallpaper to play with.

What have you made from wallpaper remnants?

Katy x

*This post was written in collaboration with Voyage Decoration

Shibori dyeing technique

One of the crafts I have enjoyed most was taught to me in a brilliant workshop run by Bethan of Decorator’s Notebook and Heather of Growing Spaces. We spent such a lovely morning together at Sisterhood Camp creating something out of nothing using the Japanese dyeing technique of Shibori. I took along an old white cotton pillowcase and managed to completely transform it with a few elastic bands and a bit of Dylon. If you would like to give Shibori a try there is a great tutorial here.

I really love the variety of colours created using the Shibori technique and I’ve been thinking about incorporating these colours into my home more. Here’s a Shoibori inspired collection of homewares that you can buy right here, including the dark blue plates featured in this post…

When I got home from Sisterhood camp I decided to turn my Shibori dyed pillowcase into a set of unique napkins. I just had to cut the case into four equal pieces and hem the edges on the sewing machine. And here are my hand dyed napkins in all their glory complimenting these gorgeous deep blue plates from Minor Goods and some ceramics from Bring The Outside In

DIY Shibori napkins | Apartment Apothecary

Our Shibori dyed fabric hanging out to dry.

Shibori 2

It was so exciting to untie the fabric after the dyeing process to reveal the pattern that I had created. I’m quite in love with the dark blue of these plates with the blue dyed napkins.

DIY Shibori napkins | Apartment Apothecary

The ceramic bowl and beakers have a really interesting glaze that complement the napkins perfectly.

If you give Shibori a go I’d love to see some pics! I would like to make a quilt next – perhaps that could be a project for the Autumn.

Katy x

Picnic bag tutorial

This month’s #TheEverydaySpruce theme is ‘getting ready for summer’. I have decided to make the perfect summer picnic or beach bag using a couple of my favourite fabrics. The bag is large enough to fit all of the summer essentials and has handy outside pockets on both sides for sun lotion, sunglasses, a bottle of water and everything you will need for a lovely day out.

Picnic bag tutorial | Apartment Apothecary

I made two of these bags, one to keep and one for a magazine. For my bag I used these great fabrics from M is for Make – I used Firefly Whisper for the lining and Half Round Kokka pattern for the pockets (I think they’ve sold out of that one at the moment).

Picnic bag tutorial | Apartment Apothecary

Picnic bag tutorial | Apartment Apothecary

What have you been doing to get ready for summer? If you’d like some ideas search for the #TheEverydaySpruce hashtag and pop over to Heather’s blog and Sarah-Lou’s blog for more inspiration.

Katy x

P.S. If you would like to make the bag here is my tutorial…

You will need:

Two pieces of heavyweight canvas or calico for the main bag measuring 50 x 75 cm – I bought mine from Home Crafts

Two pieces of heavyweight canvas or calico for the straps measuring 10 x 140 cm

Two pieces of lightweight cotton for the lining measuring 50 x 75 cm

Twelve trapezium shaped pocket pieces the top edge measuring 22cm, the bottom edge measuring 18 cm and height should be 26cm.

Medium weight iron-on interfacing for six of the pocket pieces.

Pencil, ruler, tape measure, fabric scissors, pins, matching or contrasting thread for top-stitching.

Picnic bag tutorial | Apartment Apothecary

Step by step:

Making the lining

Step 1 – Pin the two pieces of lining right sides together. Stitch the two sides and bottom edge, leaving a 20cm gap in the centre of the bottom edge.

Picnic bag tutorial | Apartment Apothecary

Step 2 – Make boxed corners. Measure 7cm from the corner seam (don’t measure from the edge of the fabric) in both directions.

Step 3 -Pull out the sides of the bucket and line the marks up. Draw a line across the corner

Step 4 – Sew along the line (I do a double row of stitching to strengthen).

Step 5 – Cut off corner and repeat on the other side of the lining. Press seams out. Set the lining aside until the end.

Making and attaching the pockets

Step 6 – Add interfacing to the six front pocket pieces (follow the manufacturer’s instructions).

Step 7 – Sew the pocket fronts to their backs by placing them right sides together, pin and then stitch all the way round, leaving a 10cm gap on one side.

Step 8 – Turn the pockets right sides out, press and make sure to press the raw edges of the gap into the pocket. These will be sewn up when you stitch the pockets to the bag.

Picnic bag tutorial | Apartment Apothecary

Step 9 – Draw a horizontal line across the bottom of the main piece, 12cm from the bottom edge. Draw a vertical line 10cm from the left side and another vertical line 10cm from the right side of the bag. Your pockets must be placed within these lines. Mark out where each pocket should go so that they are evenly space across the bag. Mark out two vertical parallel lines for each pocket so that when you stitch them on to the bag the pockets will gain volume.

Step 10 – Pin the pockets into place following the guidelines you have drawn.

Step 11 – Top stitch the pockets into place.

Step 12 – Fold the handles in half lengthways and pin together. Stitch across the top of one end and done the length of the handle. Turn in inside out (pushing it out over a broom handle is the easiest way of doing this, which is why you need to stitch up one end). Cut the stitched end off and press so that the seam runs up the centre of the handle.

Step 13 – Pin the handle into place. The raw ends of the handles should meet the raw edge of the main piece and run up between the pockets.

Step 14 – Stitch the handles into place either using a matching or contrasting thread. Only sew 4cm above the level of the pockets.

Step 15 – Stitch a square to strengthen the handles.

Repeat steps 9-14 on the other main piece.

Picnic bag tutorial | Apartment Apothecary

Making the outer bag

Step 16 – Pin the two main pieces, which now have pockets and handles attached, together, right sides facing. Stitch the two sides and bottom edge, leaving the top open. Repeat steps 2-5 to make boxed corners on the bag. However, do not leave a 20cm gap in the bottom edge.

Picnic bag tutorial | Apartment Apothecary

Attaching the lining

Step 17 – Place the bag, right sides facing out into the lining, which should be inside out. Match up the corners and the seams and pin the top edges (the raw edges) together all the way round.

Step 18 – Stitch the top edges together all the way round.

Step 19 – Pull the bag out of the lining through the 20cm gap. Stitch the 20cm gap closed.

Step 20 – Press the top edge and then turn over a 1.5cm hem inside the bag. Press this hem and then stitch it with either matching or contrasting thread.

Final shot 2