DIY poster hanger

I have been wanting to make one of these poster hangers for AGES but have put it off because I couldn’t find a proper tutorial that explained it well enough. Therefore, I had to do a bit of experimenting that ended up in me throwing pieces of wood across the room, yelling at Jules because he wouldn’t help me and spending all day getting it wrong only to finally find a solution at 6pm, hence the rather murky and rushed photos in this post. Ha!

Anyhoo, I have this wondrous Double Merrick print that was the colour inpsiration for my home office (see his AMAZING French home here; we visited him there a couple of years ago and I’m just waiting for my next invitation – hint, hint, Merrick). The print has been in a white frame that is a bit blah and I thought it would suit a poster hanger much more because a lot of Merrick’s prints are inspired by vintage French educational charts. So, here’s how I made it…

How to make a DIY poster hanger | Cheap and easy ways to hang art | Vintage style school wall chart | Apartment Apothecary

You will need:

– Four strips of half round moulding the length of your print (I chose oak rather than pine as it looks so much nicer)

– Hacksaw to cut the strips to length

– Sand paper

– Low tack tape (I used washi tape)

– Four small nails

– Hammer (yes, I use a Cath Kidston hammer!!)

– Twine

How to make a DIY poster hanger | Cheap and easy ways to hang art | Vintage style school wall chart | Apartment Apothecary

Step by step:

1. Cut four lengths of wood to the exact width of your print.

How to make a DIY poster hanger | Cheap and easy ways to hang art | Vintage style school wall chart | Apartment Apothecary

2. Use the sand paper to smooth the ends of the strips of oak.

How to make a DIY poster hanger | Cheap and easy ways to hang art | Vintage style school wall chart | Apartment Apothecary

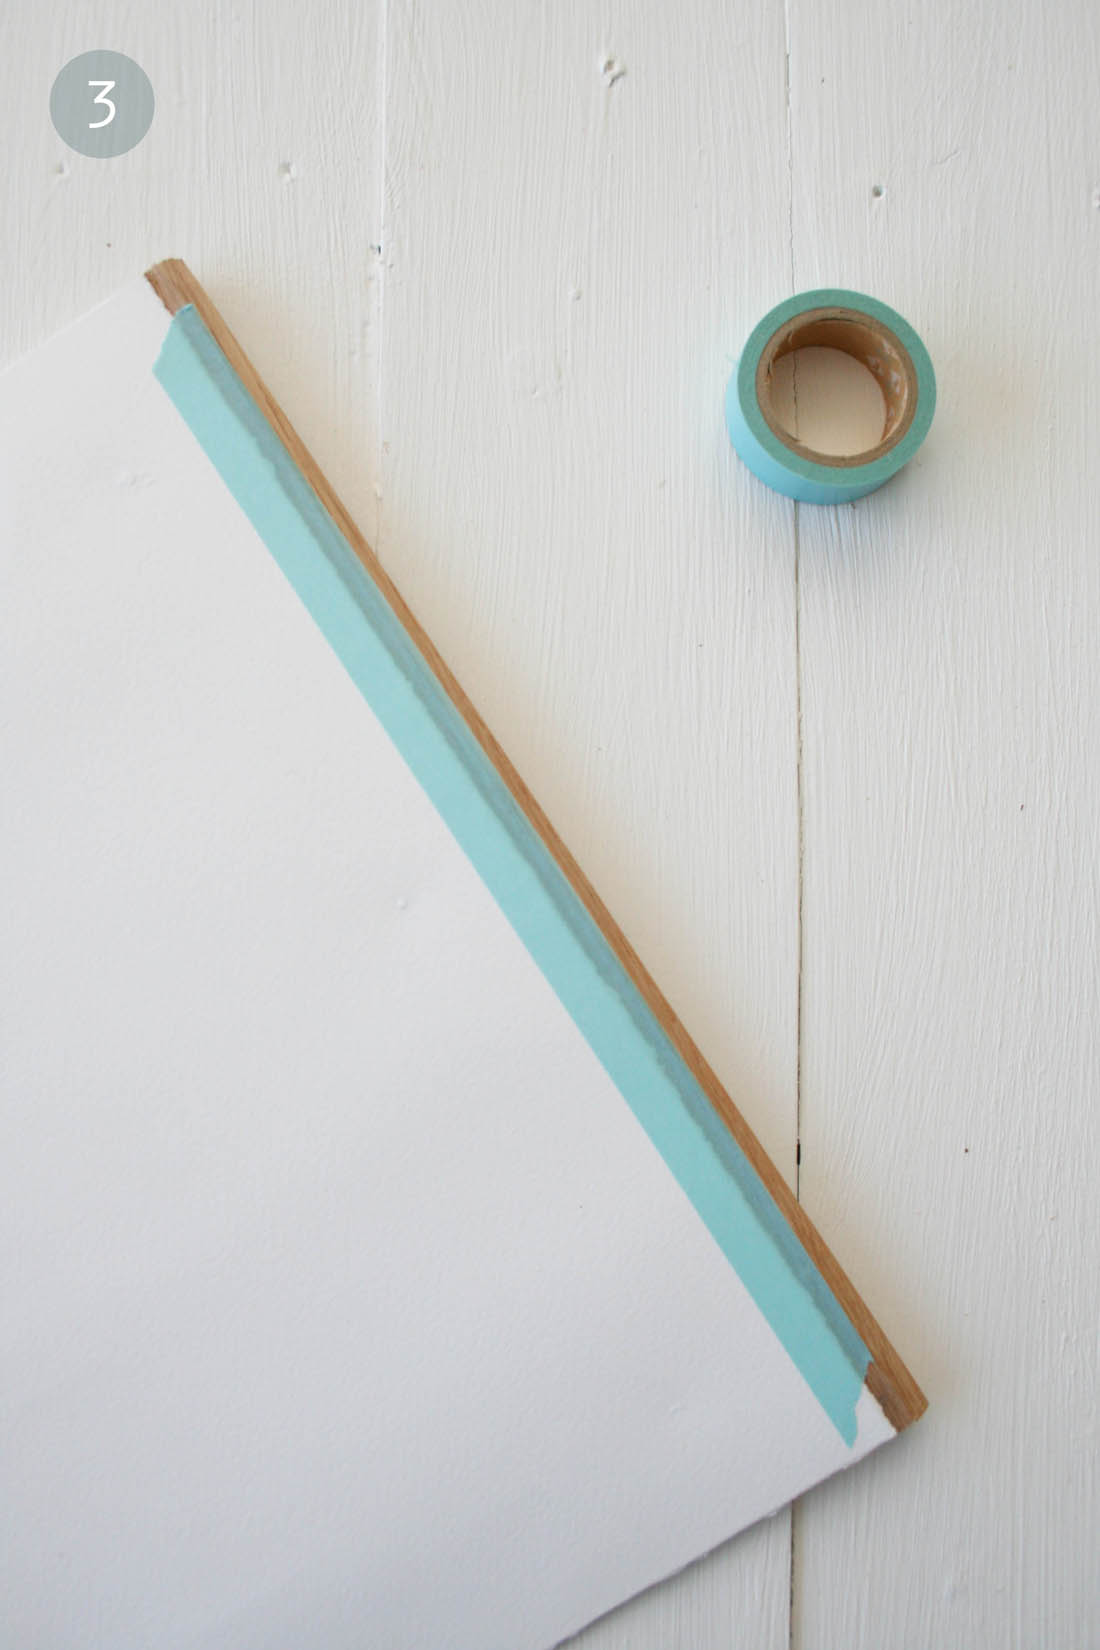
3. Use low tack tape (because it won’t ruin your print) to stick the top and bottom of your print to the strips of wood. Stick the print half way up the wood strip so that when you nail the strips together you don’t have to go through the print.

How to make a DIY poster hanger | Cheap and easy ways to hang art | Vintage style school wall chart | Apartment Apothecary

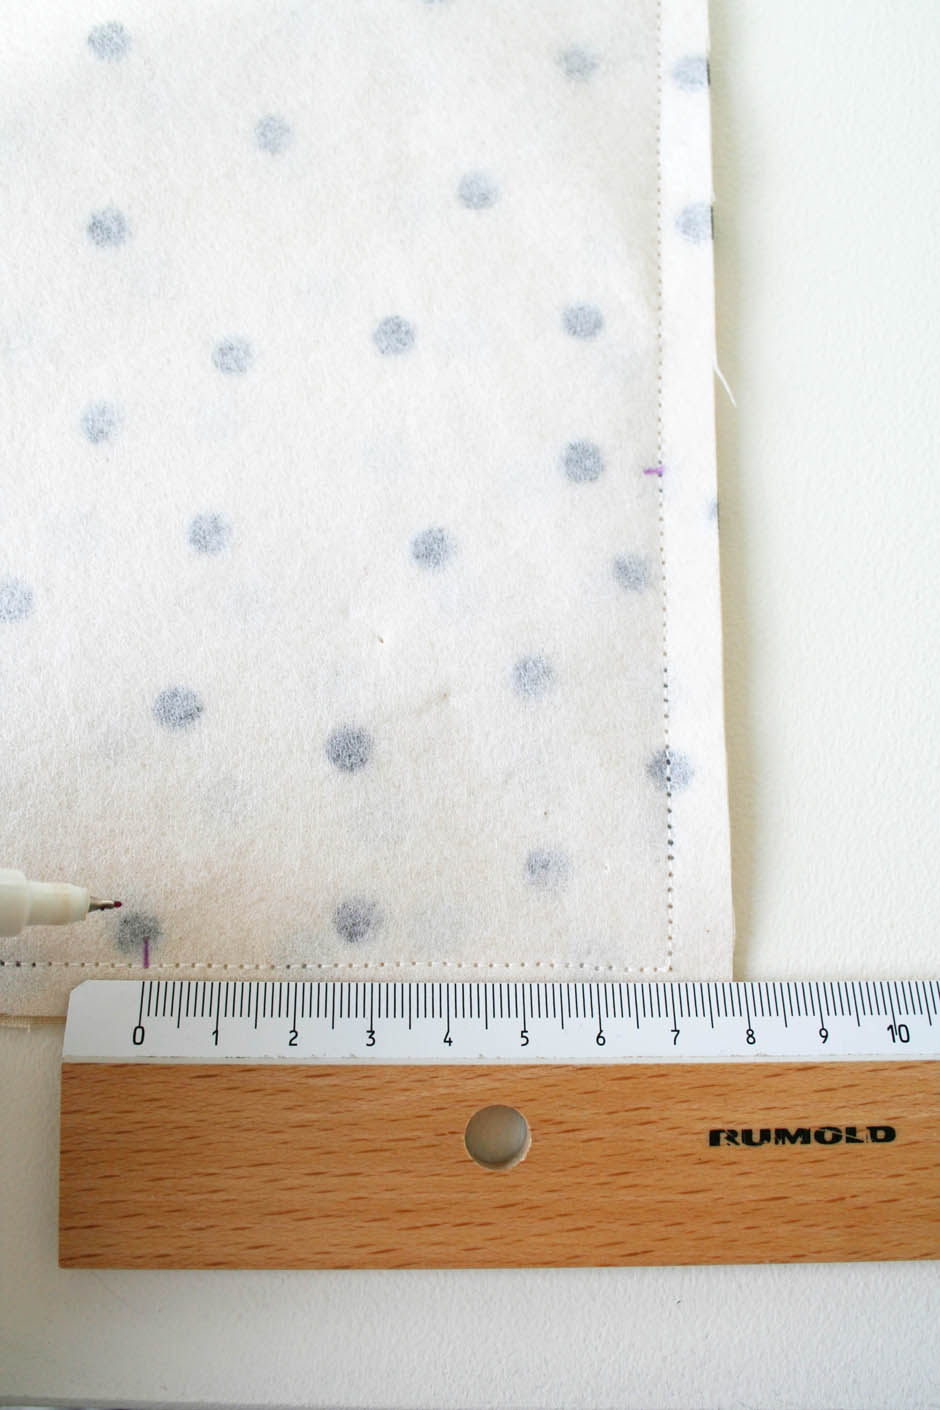
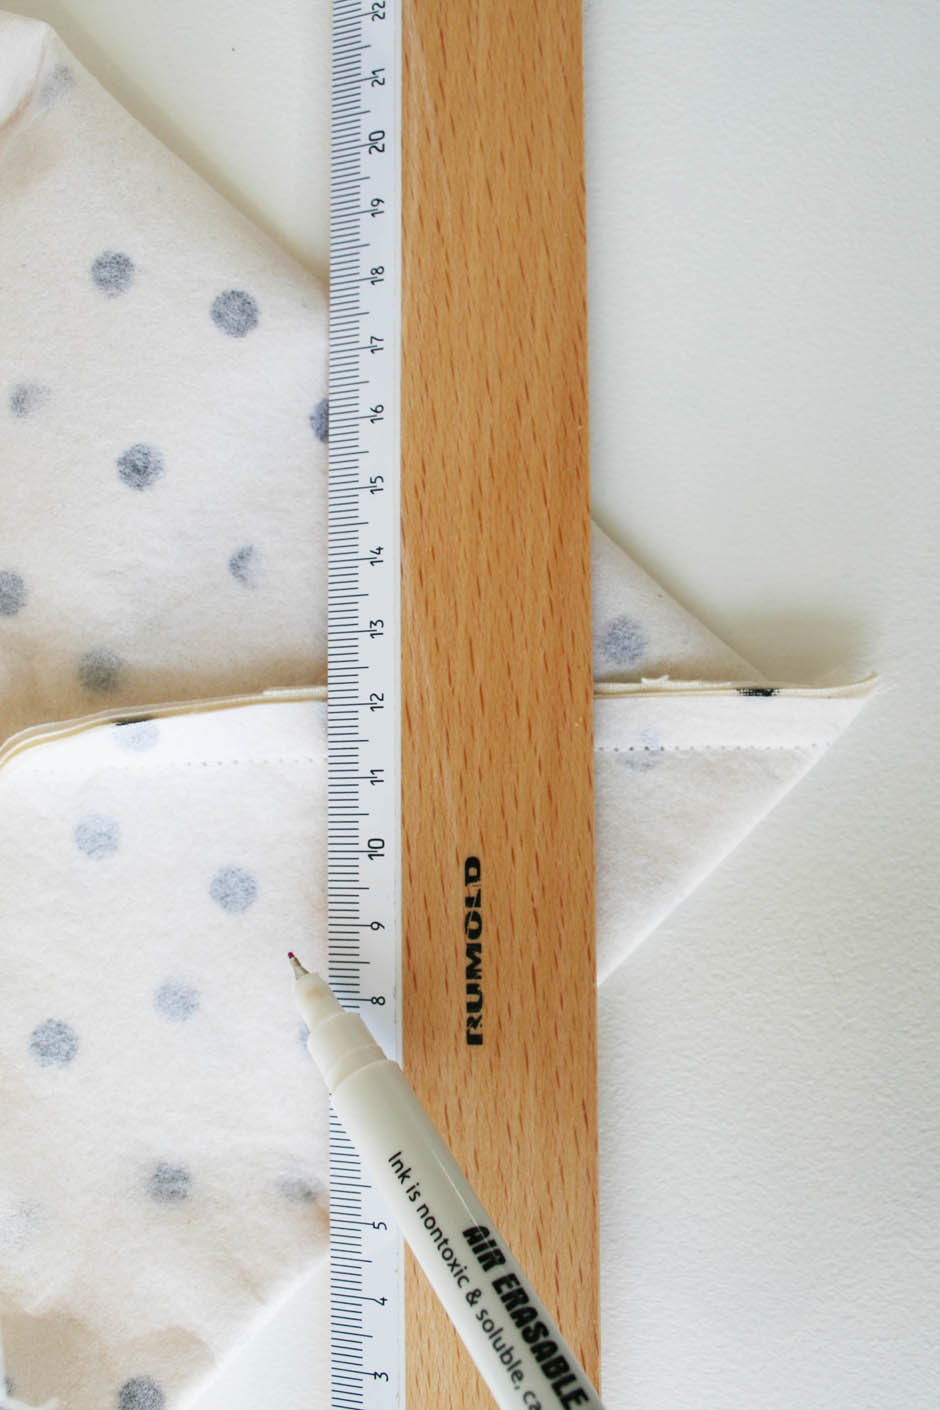
4. Place the back strip on top of the front strip, sandwiching the print between them. Ask someone to help you hold it in place or use a clamp as you are going to nail it together at either end. Measure where you want the twine to hang from and this is where you will nail the two strips together – make sure you measure it accurately otherwise it won’t hang straight. You are going to nail the two strips together from the back. Place the nail fairly near the top of the wood strip so you won’t go through the print. Hammer it in so it goes completely through the back and into the front strip but not through to the front of the strip as you don’t want to be able to see it at the front. Once the two strips are secured together, bash your nail so it bends flat against the wood strip (you will hang the twine from these). Repeat this step on the other side of the print.

You will need to nail the bottom strips of wood together too, but use shorter nails that won’t need to be bent over as you won’t need to hang twine from these.

How to make a DIY poster hanger | Cheap and easy ways to hang art | Vintage style school wall chart | Apartment Apothecary

5. Tie your twine to the bent nails at the top of your print.

How to make a DIY poster hanger | Cheap and easy ways to hang art | Vintage style school wall chart | Apartment Apothecary

And hang your print! Mine isn’t going to stay on these hooks but I’m just waiting to move a chalk board that I will be selling at our vintage jumble sale and it will be replaced with my print.

How to make a DIY poster hanger | Cheap and easy ways to hang art | Vintage style school wall chart | Apartment Apothecary

Now, let me tell you about how this DIY went wrong. Firstly, I wanted to make it simpler by making the wood strips a couple of centimentres longer than the width of the print. I then bolted them together at the ends so that you could easily swap prints in and out. However, it didn’t look great because my print is only A3 size so it all looked a bit bulky. I think this would be a good solution for larger posters.

My new idea is to embed magnets in the back of one strip of wood and use self-adhesive magnetic strip on the other strip. This would make it really easy to swap posters in and out without damaging the print. Watch this space for that.

If you want to use this idea with beautiful wrapping paper, just glue it to a piece of card first to weight it and give it extra strength. Although, it’s quite important to use as little glue as possible wth wrapping paper as it wrinkles so easily – spray glue or spray mount is the best bet.

Hope this is a useful tutorial; it’s definitely much cheaper than framing prints!

Katy x

Cafe curtain tutorial

Last week’s Ask Apartment Apothecary was about blending a work space within a guest bedroom. One of the things I suggested was hanging a cafe curtain at the window. I have done exactly this in my home office as it is perfect to diffuse direct sunlight, which can be a real problem on a computer screen whilst I work. It also adds a soft, yet minimalist, touch to a work space. Most importantly, it costs very little (I used an old sheet!) and is a very, very quick sewing project.

Here’s how…

Cafe curtain tutorial | Apartment Apothecary

You will need:

Lightweight fabric at least 2 cm wider and taller than the part of window you want to cover.

Lightweight fabric for the curtain tabs – each one needs to be 4 x 12 cm and you will need one for every 10 cm of fabric along the top of your curtain panel.

Contrasting or matching thread, fabric scissors, pins, chalk and a tape measure

You can also add a trim to the bottom of your curtain panel if you fancy (why not try lace, pom poms, crochet) or add some pretty embroidery.

Cafe curtain tutorial | Apartment Apothecary

Step by step

Step 1 – Measure your window and cut a piece of fabric allowing for a 2 cm seam allowance all round the panel. Press a double hem on all four sides of the panel – fold over 1 cm, press, then fold over 1 cm again to hide the raw edge and press. Pin in place.

Cafe curtain tutorial | Apartment Apothecary

Step 2 – Choose either a contrasting thread or matching (I chose a soft blue to give my panel a bit of definition and it is the main colour in the room where this curtain will hang) and stitch all the way round the panel.

Cafe curtain tutorial | Apartment Apothecary

Step 3 – Measure the top edge of your panel and figure out how many tabs you will need, based on having one for every 10cm, or thereabouts. Mark with the chalk where the tabs will be positioned. Cut a piece of fabric for each tab measuring 4 x 12 cm. Press the edges over (about 0.5cm) and fold in half lengthways and press.

Cafe curtain tutorial | Apartment Apothecary

Step 4 – Sew down the open side of the tab.

Cafe curtain tutorial | Apartment Apothecary

Step 5 – Pin the tabs into position, laying the two ends of the tab next to each other, not on top of each other, as this will be easier to sew and it will hang better. Press the curtain.

Cafe curtain tutorial | Apartment Apothecary

And finally, to hang the curtain you will need a piece of dowelling and two cup hooks either side of the window frame. I still need to paint mine!

Cafe curtain tutorial | Apartment Apothecary

Cafe curtain tutorial | Apartment Apothecary

And please indulge a brief moment of floral appreciation…I cut these variegated Hygrangeas at the end of last week from a plant on my balcony and they are making me so happy. Plus, they are in a new jug that I bought at Ardingly antiques fair. It’s the small things.

Cafe curtain tutorial | Apartment Apothecary

Happy sewing!

Katy x


Fabric buckets tutorial

This was such an enjoyable sewing project to do for Love Sewing magazine and I’m really pleased to be able to share it here with you today. These fabric buckets are quick and easy to make and useful for all sorts of purposes whether in the craft room, as plant pot covers, in the nursery or bathroom.

How to make fabric buckets for storing craft materials, toys or stationery | Simple sewing project | Hand printing fabric tutorial | Apartment Apothecary

You will need:

Two pieces of calico for outside of bag 40 (h) x 30 (w) cm (I bought unbleached calico from Homecrafts)

Two pieces of heavy weight interfacing 40 (h) x 30 (w) cm

Two pieces of lining fabric 40 (h) x 30 (w) cm – I used Koi Cloud fabrics, Smile and Wave print

Ruler and fabric pen or chalk to make and mark boxed corners

Tape measure and scissors to cut pattern

Black fabric paint and pencil with round eraser tip to print calico (I used Dylon black fabric paint)

Plastic sheet to protect table whilst printing calico

All seam allowances are 1cm.

Dimensions for the other sized fabric buckets:

Finished large bucket (pictured filled with wrapping paper) 40 x 35 cm – use 50 x 38 cm pieces of fabric and interfacing. Measure the boxed corners 10cm from corner.

Finished small bucket (pictured filled with embroidery flosses) 28 x 22 cm – use 34 x 26 cm pieces of fabric and interfacing. Measure the boxed corners 6cm from corner.

Finished extra small bucket (pictured filled with paint brushes) 16 x 14 cm – use 24 x 18 cm pieces of fabric and interfacing. Measure the boxed corners 4cm from corner. The gap in the lining should only be 7cm.

Tutorial:

How to make fabric buckets for storing craft materials, toys or stationery | Simple sewing project | Hand printing fabric tutorial | Apartment Apothecary

N.B. Instructions are for the medium 32 (h) x 26 (w) cm fabric bucket (pictured filled with balls of string).

Step 1 -Personalise the calico by hand printing polka dots using the eraser tip of a pencil. Protect your table with plastic sheeting (or use a bin liner). Dip the eraser into the paint and print onto fabric, making sure you press firmly and that all of the eraser comes into contact with the fabric. Print polka dots – no pattern is necessary, just random spots look great. Follow the instructions on your paint to fix the colour. This really is as easy as it looks!

How to make fabric buckets for storing craft materials, toys or stationery | Simple sewing project | Hand printing fabric tutorial | Apartment Apothecary

Step 2 – Attach the interfacing to the calico pieces by following the manufacturer’s instructions. I used iron-on heavy weight interfacing to make it as rigid as possible so the bucket will stand on it’s own.

Step 3 – Place the the two calico outer pieces right sides together and sew the two sides (40cm) and bottom (30cm).

Step 4a – Make boxed corners. Measure 7cm from the corner seam (don’t measure from the edge of the fabric) in both directions.

Step 4b -Pull out the sides of the bucket and line the marks up.

Step 4c – Draw a line across the corner and sew along the line (I do a double row of stitching to strengthen).

Step 4d – Cut off corner and repeat on the other side of the bucket. Press seams out and turn the bucket right sides out.

How to make fabric buckets for storing craft materials, toys or stationery | Simple sewing project | Hand printing fabric tutorial | Apartment Apothecary

Step 5 – Place the two pieces of lining fabric right sides together and sew the two sides (40cm) and bottom (30cm), but this time leave a 10cm gap in the middle of the bottom pieces.

How to make fabric buckets for storing craft materials, toys or stationery | Simple sewing project | Hand printing fabric tutorial | Apartment Apothecary

Step 6 – Make boxed corners by repeating step 4. Press seams out but don’t turn the lining rights sides out.

Step 7 – Place the calico outer inside the lining i.e. the right side of the calico outer should be next to the right side of the lining. Make sure you line up the seams and boxed corners. You also need to line up the top edges of the lining and the calico bucket.

How to make fabric buckets for storing craft materials, toys or stationery | Simple sewing project | Hand printing fabric tutorial | Apartment Apothecary

Step 8 – Sew the top edges of the lining and the outer bucket. Cut away any seam allowance.

How to make fabric buckets for storing craft materials, toys or stationery | Simple sewing project | Hand printing fabric tutorial | Apartment Apothecary

Step 9 -Gently pull the outer bucket through the 10cm gap in the lining.

How to make fabric buckets for storing craft materials, toys or stationery | Simple sewing project | Hand printing fabric tutorial | Apartment Apothecary

Step 10 -Top stitch the 10 cm gap closed.

How to make fabric buckets for storing craft materials, toys or stationery | Simple sewing project | Hand printing fabric tutorial | Apartment Apothecary

Step 11 – Press the top edge of the bucket and topstitch all the way round. Turn over as much or as little of the top of the bucket as you want to and the buckets are fully reversible if you fancy a change.

How to make fabric buckets for storing craft materials, toys or stationery | Simple sewing project | Hand printing fabric tutorial | Apartment Apothecary

How to make fabric buckets for storing craft materials, toys or stationery | Simple sewing project | Hand printing fabric tutorial | Apartment Apothecary

How to make fabric buckets for storing craft materials, toys or stationery | Simple sewing project | Hand printing fabric tutorial | Apartment Apothecary

How to make fabric buckets for storing craft materials, toys or stationery | Simple sewing project | Hand printing fabric tutorial | Apartment Apothecary

If you do make them I’d love to see a pic! I’m definitely going to do more fabric printing – it’s quite addictive once you start.

Katy x


Coat hanger jackets

When Sarah-Lou and Heather began their The Everyday Spruce project I was immediately hooked; the name of the project basically describes my life. I spend everyday at home trying to make things more beautiful or functional. I have a mental list of everything in my home that needs improving, clarifying or beautifying. Strangely, the list never seems to get shorter or finished.

Anyhoo, I am very pleased to be joining them and contributing my idea of ways to spruce up your life (I will focus on home ideas) in one way or another. They would also love others to join in with their project so please do join in, too!

I have a really quick and easy sewing project for you today to help you spruce up your wardrobe – I don’t know about you, but me and mine are at constant odds with each other. One of the problems is I can’t justify buying a matching set of beautiful hangers so I have loads of awful wire ones that get mangled and twisted together. Is there anything more frustrating than pulling something out of your wardrobe only to find the hangers are fused together?!

These simple little coat hanger jackets really help and they look good. Double win.

How to make coat hanger covers | Apartment Apothecary

You will need:

Medium weight fabric, cotton or linen work best – approx. 42 x 18 cm for each hanger. I used Kokka Crossed Leaves in Turquoise and Kokka Circle Flowers Yellow in cotton linen mix from Guthrie & Ghani.

Fabric scissors

Pencil

Pins

How to make coat hanger covers | Apartment Apothecary

Step by step:

Step 1 – Place two pieces of fabric together (this will be the front and back of the jacket) and make sure the piece of fabric on top is wrong side up. Pin the fabric together. Lay your coat hanger on top and draw around it, except the hook part, as this will not be covered by the jacket.

Step 2 – Cut 1cm outside the line around the shoulders of the hanger but cut 4cm outside the bottom line of the hanger.

How to make coat hanger covers | Apartment Apothecary

Step 3 – Unpin the two pieces of fabric and press a 0.5cm hem on the bottom edge of each piece. Repeat this so you can no longer see the raw edge.

How to make coat hanger covers | Apartment Apothecary

Step 4 – Sew the hem as near to the bottom edge of the fabric as possible. Do this for each piece of fabric.

How to make coat hanger covers | Apartment Apothecary

Step 5 – Pin the two hemmed pieces together, right sides facing.

How to make coat hanger covers | Apartment Apothecary

Step 6 – Sew the two pieces together. Start from the bottom edge and sew up the shoulder of the hanger but stop in the middle and leave a 1cm hole for the hook to go through. Begin sewing again down the other shoulder to the bottom edge.

Step 7 – Press the seams open, turn the jacket inside out and press. Do not sew the bottom edge together – this will remain open.

How to make coat hanger covers | Apartment Apothecary

Step 8 – Place the jacket over the top of the hanger, push the hook through the 1cm gap at the top and it should be a snug fit.

Coat hanger covers tutorial | Apartment Apothecary

I look forward to seeing loads more sprucing tips – do join in with the project and perhaps it will help shorten my mental list of things that needs tending to at home. Share your post/tip using the hashtag #theeverydayspruce.

Katy x

How to make an ironing board cover

A quick and easy sewing tutorial for you today that I made and wrote for the wondrous Love Sewing magazine last month. I have a couple more sewing projects for the home in this month’s edition of the magazine that you can buy here. I have to say, I am seriously considering learning how to make clothes after discovering this magazine; imagine how much money I could save myself!

Have you been following Heather’s and Sarah-Lou’s #TheEverydaySpruce project, which is all about simplifying, clarifying and beautifying? Well, beautifying even the most mundane of household items can make a difference to the overall look and feel of your home. When I am sewing I always have my ironing board up in my home office and I realised that the cover was totally knackered and had become a complete eyesore. So, I decided to make a new cover, which is so easy to do and now having the ironing board up (I know so many people who have it up all of the time!) isn’t quite so bad.

Ironing board cover tutorial | Apartment Apothecary

You will need:

Medium weight cotton – the size will depend on your board. I used Laura Ashley’s Clarissa print.

Fabric scissors

The cord from your old cover

Pins

Pencil

Ironing board cover tutorial | Apartment Apothecary

Step by step:

Step 1 – Lay your fabric on the floor and place your board on top. Draw an outline of the board 10cm from the edge.

Step 2 – Cut out around the line.

Ironing board cover tutorial | Apartment Apothecary

Step 3 – Iron a 1cm hem all around the piece of fabric.

Step 4 – Fold the hem over again but this time the fold should be 2cm wide. You will need to make pleats at certain points to get round the curves of the board shape. Make sure all of the pleats face the same direction.

Ironing board cover tutorial | Apartment Apothecary

Step 5 – Remove the cord from your old board cover and place it around the board within the channel you have created. Pin it into place so it does not escape the channel.

Step 6 – Make sure the two ends of the cord meet in the centre at the bottom end of the board (not the pointed head). Place two pins in the channel either side of the ends of the cord so you know not to sew pass these points.

Ironing board cover tutorial | Apartment Apothecary

Step 7 – Sew the channel ensuring that the cord remains on the right side of the foot and does not get sewn over. Start sewing next to your marker pin.

Step 8 – Keep the foam from your old cover (you can adhere this to your new cover with spray glue but it’s not necessary) and place your new cover over this. Pull the cords as tightly as possible and tie in a bow. Give your new cover an iron!

Ironing board cover tutorial | Apartment Apothecary

How to make an ironing board cover | Apartment Apothecary

Keep on sprucing…

Katy x