Stripping the house out

It’s been a few weeks since we completed on the house and even though our contractor doesn’t start until the end of May we wanted to get a head start by stripping out the floor and plaster from the house so that we can get the electrics and plumbing redone. For various reasons we have been forced to remove most of the plasterwork (rather than just skimming over what was there) so even though brand new electrics and plumbing aren’t completely essential it makes a lot of sense to get it all done at this point whilst the house is stripped back.

This is what will be Mimi’s bedroom with the nice surprise of another original door in the loft.

The cost of paying for a skip and someone to strip the plaster has been cheaper than the quote to remove the wallpaper throughout the house so we decided not to do it ourselves – there’s just no way we could have juggled it with looking after Mimi especially as there will be so many other DIY jobs to be done along the way.

As a result of removing the plaster we will have to reinstate all the coving and picture rails but I’m very much looking forward to lovely smooth walls and perfectly positioned light switches, power points, radiators and the assurance of a brand new boiler. Apart from anything I just love being able to see the bare bones of the building and discovering original doors stashed in the loft!

Here is how the house looks now…

Downstairs

The carpet has been ripped off the stairs and I’m still not decided yet as to whether we will re-carpet them. I’m a bit worried that a carpet on the stairs will get very dirty with a dog so I’m going to think about it a bit longer. The laminate has also gone from all the floors downstairs. I am very, very pleased that the floorboards are in such a good condition as that will save us a fortune on new flooring (although a little sad I can’t justify herringbone parquet).

We are actually going to keep this side of the kitchen as it is until we have the budget to completely re-do it and push it out into an extension. This is a big compromise but I’d much rather have a brand new bathroom and make do with the kitchen as it is for a while (I know a lot of people will disagree with that preference!).

The back reception has had a lot of its plaster removed and floor stripped – we just need to get rid of the fireplace now.

The plaster in the front reception has been partially stripped as it wasn’t in too bad a condition and again we need to get rid of the fireplace although some who have seen it rather like it…what do you think?! I would like to have a wood burning stove in this side of the room if budget allows.

Upstairs

All of the ceilings upstairs have been taken down as they were plastered so long ago they need updating. Therefore we can now see right up into the loft space, which is quite amazing. We also found an original hearth in the front bedroom, which will be our room. It’s a shame that the tiles are so cracked. I think we will carpet upstairs so these will get covered up again unless I can get Jules to agree to adding a fireplace to our room. It would be purely for aesthetics but I think it would be so nice to add a bit of character back to the house.

The small bedroom has also been stripped out and it will eventually become a small guest room.

It feels very exciting to see changes happening to the house already and so much easier to visualise the space now that the previous owner’s stuff has all gone. I’ll keep you updated!

Katy x

Green fingers with Homesense this Spring

Wasn’t last week completely wondrous? All that beautiful weather and time spent outside. Staying with my sister whilst we renovate the new house we don’t have a garden here but we did spend quite a bit of time in my mum’s garden and Mimi had her very first paddling pool experience, which she thought was the best thing ever. As I have already talked about I have started thinking a lot about our new garden and the possibilities of making it the perfect space for us so I jumped at the chance to team up with Homesense to have a good look at their huge garden collection and show you some of my favourite pieces and share ideas to make the most of your green fingers: whether you have just a windowsill, balcony or sprawling garden.

I visited the North Greenwich Homesense store and I love the thrill of never knowing what I will find there (I go there a little too much, truth be told) as the stock is updated every day with one off finds and once it’s gone, it’s gone. I also love the fact that there are so many bargains to be had as the Homesense prices are often way below the recommended retail price – is it sad I get excited every time I look at the price tag?! At the moment we are restricted to indoor plants at my sister’s flat – she would love to grow her own herbs as she’s an amazing cook. Therefore, I was on the lookout for pots for herbs for her as well as a few things to make my mum’s garden a little more welcoming. Here is what I found and my top tips for making the most of your indoor plants and/or garden space:

1. Plant your own herbs

Whether you have a huge garden or just a tiny kitchen windowsill, herbs are such a perfect way to introduce green into your home. Also, if you are able to grow, pick and use your own herbs you can play your part in reducing waste because you won’t need to buy those hideously expensive plastic packs from the supermarket. I found these brilliant pots in Homesense that are self watering, which is perfect if you want to make growing plants as hassle free as possible. You just fill up the bottom of the pot with water and a thick piece of string goes up into the soil and down into the water reserve and sucks up water as and when needed. Very clever and especially good if you are prone to under-watering or over-watering your plants. They also come with a pair of herb scissors so you can snip what you need for whatever you are cooking.

These clever self watering herb pots were £6.99 compared to the RRP of £10.99 and they even come with a pair of herb scissors.

2. Hanging herb planters

A good tip is to plant herbs in a hanging planter for your kitchen as that frees up worktop or windowsill space and I think they look great too. If you have a garden you can plant herbs into a colander (provides perfect drainage and looks great) and hang it by the back door so you can access herbs easily.

This hanging planter has a unique draining system so it collects a reserve of water in its base so you are not in danger of overwatering your herbs and you can empty it via a plug in the base. It also acts as a self watering system. This great pot was only £4.99 compared to its RRP of £12.99 and it is ideal for my sister’s kitchen as she doesn’t have much worktop space to spare for pots.

3. Watering tricks for indoor plants

Firstly, always keep an indoor watering can full of water by your most thirsty plants as this way you are much more likely to water them. Secondly, if you are going on holiday during this warmer weather and are worried about your plants dying place a cup of water next to them and place a string in the water and put the other end of the string into the soil of the plant. It will water itself whilst you are away!

4. Terrarium

If you want to be more green fingered but don’t have a garden try planting a terrarium. I picked up a lovely glass lantern at Homesense and instead of putting a candle in it I planted it with succulents that require very little water and looking after so the perfect way to introduce green into your home with minimal effort. To find out more about planting terrariums read my terrarium guide.

A new addition to my bedside table in my sister’s house. This pretty lantern makes a perfect terrarium for succulents and it only cost £9.99. There is a huge range of all sorts of garden accessories in store at Homesense from lanterns to birdhouses.

5. Use baskets as pots

Homesense is full to the rafters with all sorts of pots and planters but have you ever thought about using a basket? It’s a great way to hide a very cheap plastic plant pot that plants often come in and adds great texture to any room. Homesense have the best selection of baskets and I even found ones lined with plastic that would be ideal.

This lovely basket is ideal for one of my plants that I bought in a cheap plastic pot. I love the contrast between the basket and the plant itself. I have placed a dish in the bottom of the basket so that any water drains out into that so the basket doesn’t get ruined. I found this basket in Homesense for just £12.99.
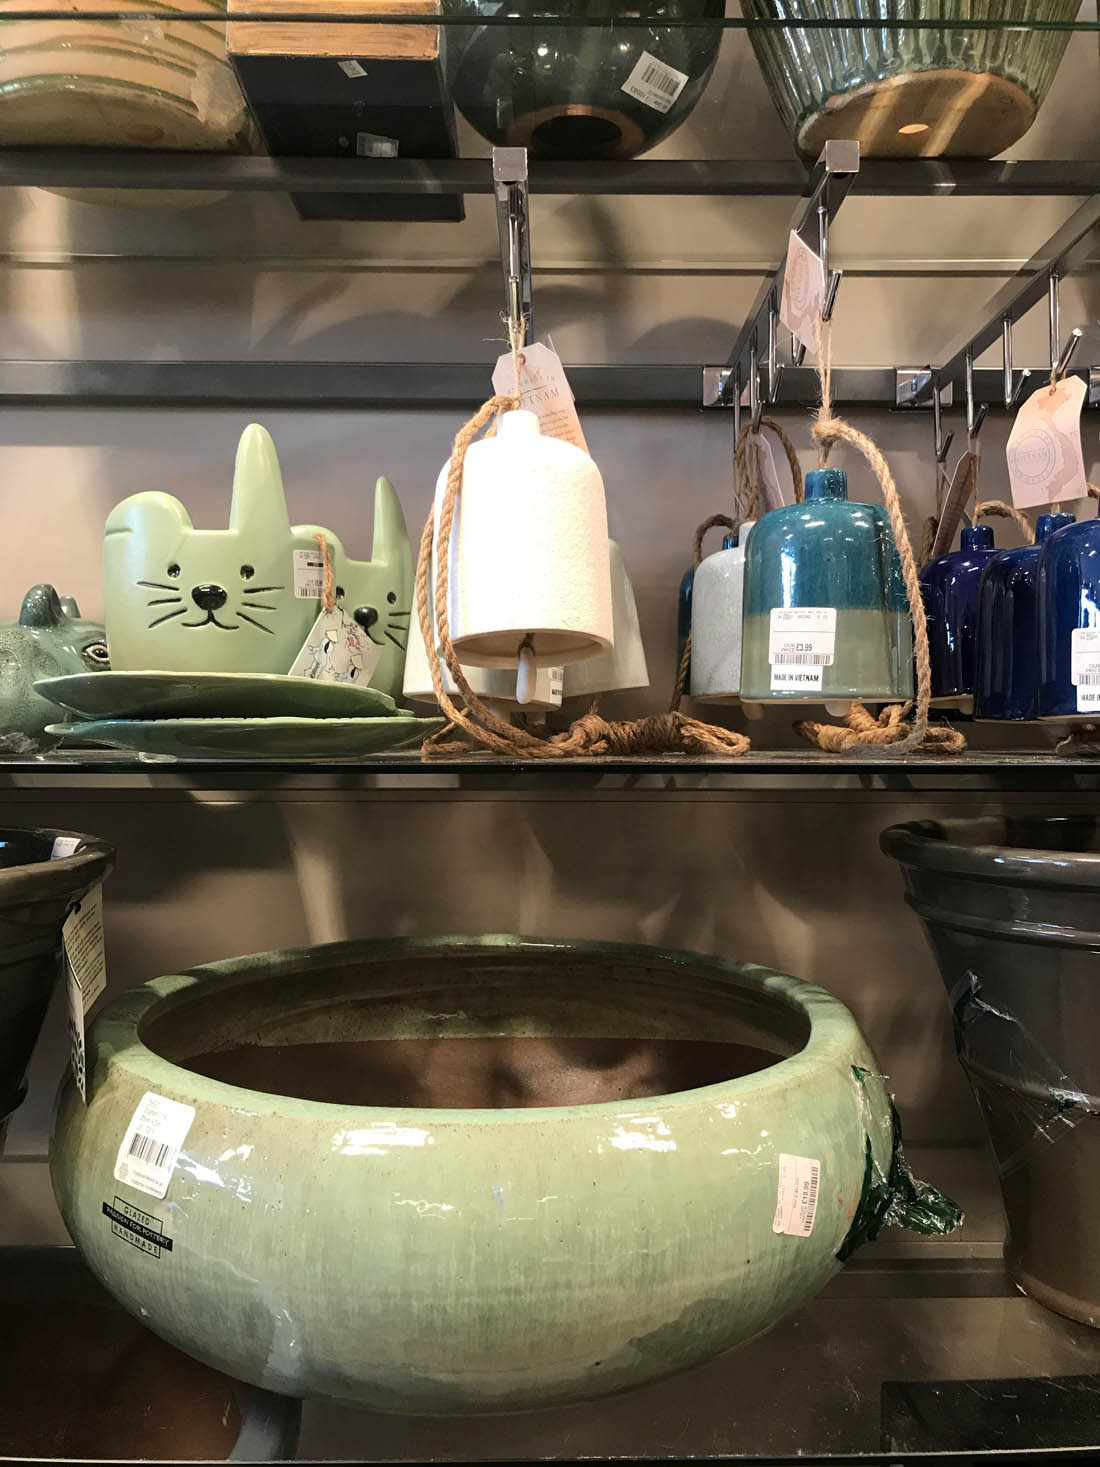
6. Eclectic pots

Make your pots as interesting as your plants to make your garden or indoor plants a real showstopper. Homesense has a huge variety of pots: ceramic, glazed, all the colours of the rainbow, novelty shapes, big, small, you name it, they have it.

Homesense have a really big range of pots that it is so hard to find elsewhere let alone at such reasonable prices.

I absolutely loved the glazed green pot below that would perfect filled with succulents in the garden and it was only £19.99 compared to its RRP of £39.99. I can;t stop thinking about it and wish I had bought it but it was too big and heavy for me to carry home by myself with the other stuff I bought. I HATE shopper’s regret!

7. Create an inviting spot in your garden to hang out

Whether you invest in a full garden furniture set (check out the one I found below in the North Greenwich store!), simply add outdoor cushions to your garden chairs or set up a rug on the grass you do need to make the space appealing otherwise it is less likely to be used. I found a brilliant selection of outdoor rugs in store and I immediately bought one as I have ruined way too many wool rugs over the years by plonking them on the grass to be mucked up by mud and whatever else. I will also take this out with me every day in the warmer weather so that Mimi and I can stop in the park and sit on the grass. I also grabbed one of these fab jute pouffes as they are great extra seats or can be used as a footstool with a garden chair. They can also be used indoors during the rest of the year.

I love these jute pouffes that double up as an extra seat or footstool for a garden chair as well as being able to take them inside as they add loads of texture and warmth to interiors. This pouffe was £29.99 compared to the RRP of £39.99.

Otto is very keen on the outdoor rug I bought that has a waterproof backing. He basically spent all weekend lounging out on it.

I was very excited by this garden set that I spotted in store for £549.99 for six chairs and the table, which compared to a lot of outdoor dining sets is very reasonable indeed especially as the chairs are very comfortable.

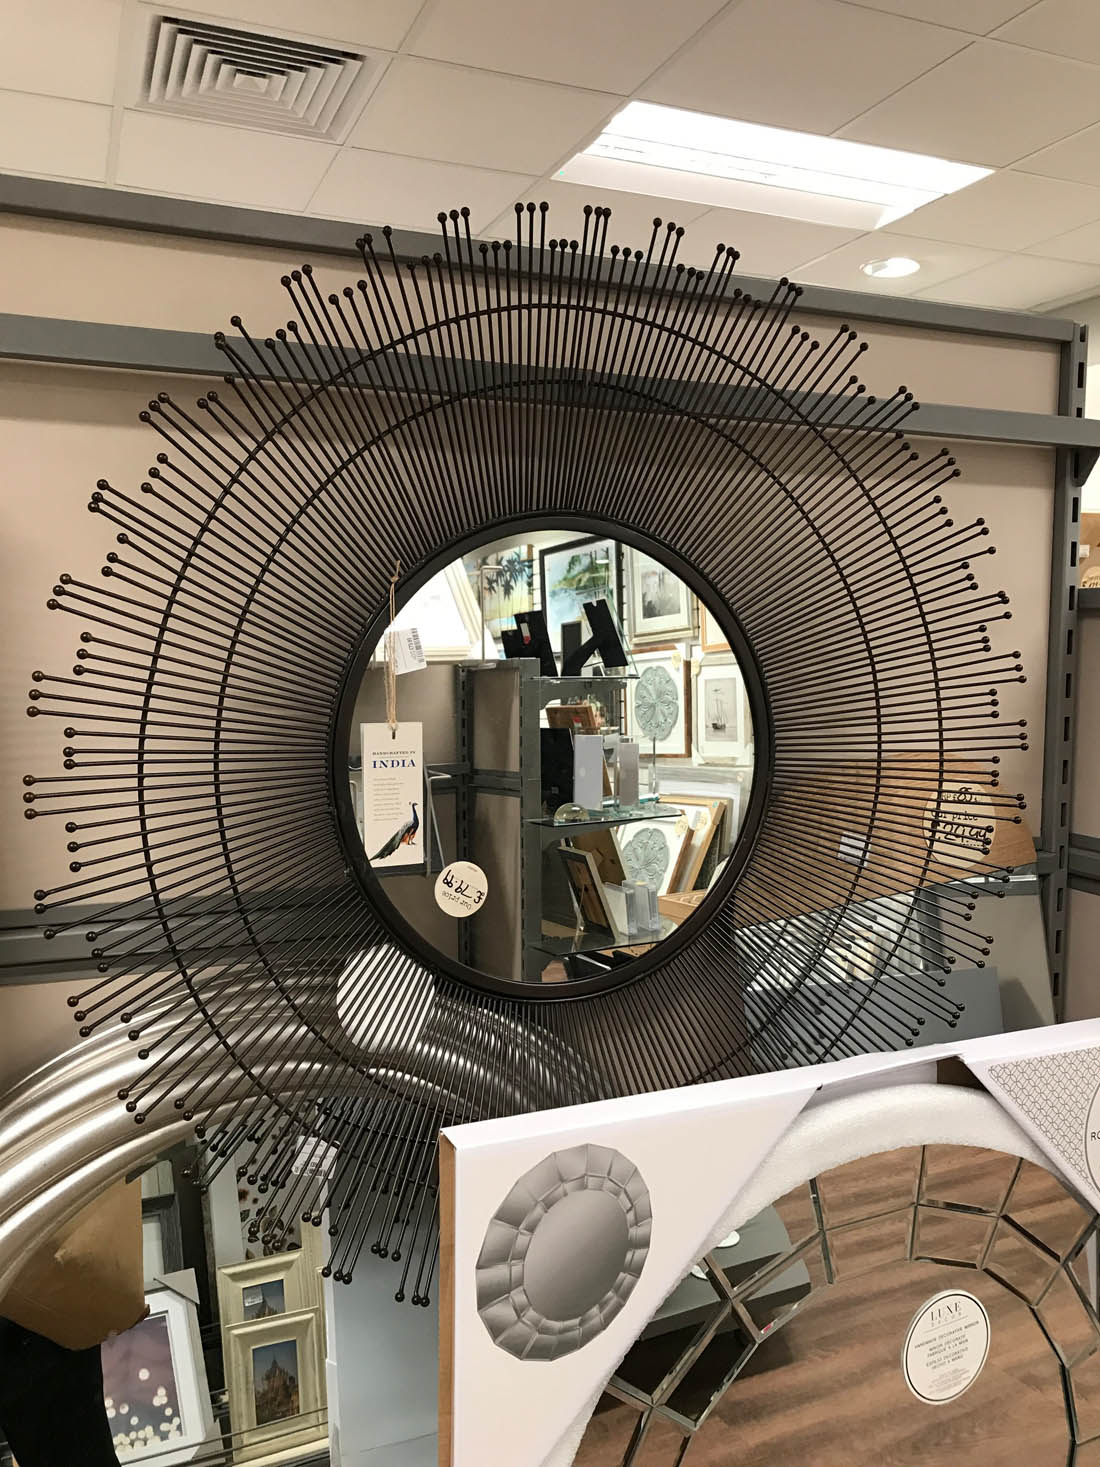
8. Add a mirror to your garden

A mirror is a great way of making a small garden or terrace feel bigger and can be a good focal point. I found loads of beautiful metal mirrors in Homesense that would be perfect and the more exposed to the weather they are the better they will look, in my opinion.

The mirror on the right cost £49.99 compared to £109.99! A huge saving and it would look amazing in a garden as it resembles the sun and would age beautifully over time.

9. Lighting

We tried to have dinner in my mum’s garden the other day and realised that it was too dark and they have no lights that make it possible to be outside after dark so I think lighting is crucial. Try LED or solar lights as a really easy option. There’s a great range in store of all shapes and sizes.

10. Get equipped

If you do want to be more green fingered it is very important to commit to it and have what you need to make planting and caring for your plants as easy as possible otherwise you are liable to waste a lot of money on plants that just die. A potting bench is a great investment for the garden and get some basic tools – you can find everything you need in Homesense’s garden collection.

I would love this potting bench in my new garden – the galvanised metal top is perfect.

The garden collection at Homesense extends to all the practical things you will need for gardening so you really don’t need to go to the garden centre at all to get started.

All we need now is for the sun to come back so we can get back out into the garden! Now, do I head back to Homesense to see if that big green pot is still there…

Katy x

*This post was written in collaboration with Homesense

The Firepod pizza oven

I have LOVED this week – what a difference all this sun and heat makes! Pure, pure joy. We are lucky enough to be able to use my mum’s garden and being able to let Mimi loose there is a bit of a lifesaver as she has so much energy. I can not tell you how much I am looking forward to having our own garden soon; it’s probably what I am most excited about when we move in to the new house. With that in mind I was really excited to be approached by the small team behind the Firepod who have very recently launched their amazing outdoor pizza oven. I met up with the inventor of the oven who talked me through the sleek design that not only looks great but makes the most delicious pizzas.

We decided to gather at lunchtime this week when it was boiling hot and we brought the pizza oven up onto the balcony in my mum’s garden. Mimi was in and out of the paddling pool and I made pizzas for her and the grandparents. They were so impressed! Mimi got a special rainbow veggie one – I like being able to make my own pizza for her as I can control the salt levels and pile it up with vegetables that she is more than happy to eat as they are combined with cheese and the pizza base.

I love the simple, Scandi-looking design (available in a few different colours); it’s very compact and easy to transport, especially because you can remove the tall legs and add short legs so ideal to take on camping trips, for example. It is also very, very easy to use – on our first go at making pizzas we were blown away by how good they were! We made our own dough, which was also much easier than we thought, and it really is as simple as heating up the oven (you need a gas canister, which are sold in hardware and DIY shops), placing the pizza in the oven using a pizza peel that is included and removing it when it is ready. They are honestly delicious – I’d go as far as saying that they are better than most pizza restaurants I’ve been to.

The flavour combo that I have discovered is the best thing ever is a thin layer of tomato sauce, artichokes, roquito chilli peppers (the small sweet ones that you get in jars), black olives, buffalo mozzarella and grated mozzarella. BEST THING EVER.

Mimi had a great time, gobbled up most of her pizza but also fed a fair bit to the dogs, natch. We have now made pizzas twice and tried out loads of different flavour combos. They always come out perfectly as long as you roll the dough out thinly enough and don’t overcook them.

The brilliant thing about the oven is that you can replace the pizza stone with a griddle set that you buy separately so we can cook outdoors very easily using gas. This really appeals to me as I absolutely hate smelly cooking so cooking steak, for example, is my worst nightmare. This way Jules can happily cook meat outdoors without filling the house with smells and smoke. The griddle also has a flat side so you can do eggs and pancakes and the like on it – perfect camping breakfasts.

We are really looking forward to holding pizza parties over the summer and we already have one booked in when my little sister comes to stay with her new baby at the end of next month. It is such a lovely sociable thing to cook for friends as everyone can chip in and add their own toppings. The prep and washing up is also minimal, which is a winner in my book.

You can buy a Firepod direct from their site and you can also support their crowdfunding (as it is a new product that they want to develop) and the link to their Indiegogo page is here. I really wish them lots of luck for the future of their company as we think the Firepod is a brilliant product and can’t wait to use it more.

Katy x

*This post was written in collaboration with Firepod.

Children’s bedroom inspiration with Coming Kids

I want to start off by saying a big thank you to everyone who messaged me or left a comment on my last blog post to wish us well in our new house. I was really touched by the number of people who took the time to contact me and it has made me even more excited for the upcoming project.

We plan to give Mimi the back bedroom in the new house (you can see the floor plan in my last post). Friends and family who have seen the house have been surprised that we aren’t going to make the small bedroom her nursery leaving the bigger room as a guest room. However, it doesn’t make sense to me to squeeze her into a tiny bedroom that won’t have enough storage for her clothes and toys and will be used day in day out yet leave the bigger room unused for 95% of the time except for the odd visit from guests. In our flat we used her nursery so much from day one and I don’t see that changing – if anything I think she will use her room more and more as she gets older.

When I planned her nursery before she was born I had no idea how we would use the room so it feels nice to be able to plan a new room for her now that we know her inside and out. I came across the online shop Cuckooland a few weeks back as I saw one of their products on Facebook (it was this mud kitchen that I am SO excited about getting for our garden). Coincidentally they got in touch me not long afterwards and asked me to share my favourite products from a new brand that they stock called Coming Kids. As soon as I saw the products I agreed as they are right up my street and actually really remind me of the vibe of Mimi’s old nursery and the sort of look I want to create in her new room. Designed in the Netherlands I love the brand’s clean minimal feel and the mint, grey and white colour schemes with touches of black combined with natural materials like wood and leather. These are my top picks from the range…

It was actually the vintage looking wardrobe that caught my eye first as we don’t have one and even though genuine vintage is so nice I know that this brand new wardrobe would be super practical but it still has the character that I want from furniture. I also love that colour! I really like the more modern looking wardrobe with leather handles – nursery furniture does not need to be boring or twee, which is what I find most of the nursery furniture sets that I find tend to be.

When I was a child I was obsessed with the idea of having a raised bed with a desk or secret cubby hole underneath so I LOVE the cabin bed and the playpen is brilliant as it adjusts to grow with your child – have a look here to see how it transforms. One of the pieces that we bought for Mimi’s nursery in the flat was a daybed and I felt grateful for it every single day as it proved so, so useful for feeding, stories before bed, dressing her, cuddles in the night when she was sick and it provided lots of storage. Honestly, you need one if you can fit it in. I wish I had bought this one as it looks much nicer than the one we bought and it is actually white instead of off white, which I was never keen on against white walls.

I look forward to when Mimi is old enough for a desk in her room as the little writing bureau that I was given by my parents on my seventh birthday was so special to me. I really like the desks by Coming Kids and the shelving unit with the fold down desk seems like a brilliant piece to me.

What do you think? Do pop over and have a look at the full range by Coming Kids and let me know what your favourite pieces are. I’ll show you plans for Mimi’s new room soon!

Katy x

*This post was written in collaboration with Cuckooland.

Our new house – the estate agent pics

Oh hello blog, my old friend. And hello, lovely readers! I am so sorry for being absent for so long – the last three months, since I blogged last, have flown by in a haze of running around after a very adventurous toddler and spending every nap time desperately trying to push the purchase of our new house through dealing with surveyors, solicitors, agents, builders and mortgage advisors. It was definitely not a straightforward purchase and after buying my previous two flats, which were both new builds and therefore pretty easy in terms of the conveyancing, it came as quite a shock to the system just how much time, energy and headspace this purchase would take. I immediately knew when I saw the house that it would be perfect for us and I was so invested from the first moment so when it looked like the purchase might fall through on a couple of occasions I felt sick to my stomach. This was the only house we could afford in Ladywell, which is the area we wanted to be in (as it is a probate property that needs renovation and therefore that bit cheaper than equivalent houses), so that really added to the stress levels. Also, my levels of productivity throughout the process fell to an all time low because I felt so stuck in the limbo of having no idea whether or not we would be moving on and whether we needed to pack up and I lost all pleasure in being in the flat because I wanted to be elsewhere. I have discovered that living in a half packed home is not good for my mental well being.

Anyhoo, the good news is that we finally completed the purchase last week and the sale of our flat went through really smoothly so it’s all done! We can’t actually move in to the new house for a few months as it needs to be completely renovated so we are currently staying with my very kind sister who is willing to put up with us all for the summer. Mimi is completely obsessed with her so she’s very happy about the temporary move although Otto isn’t quite so pleased and it seems like he’s desperate to ‘go home’, which is making me sad. Hopefully he will settle down soon.

I’m hoping to be able to post here more regularly now that I HAVE A WHOLE HOUSE TO DECORATE FROM SCRATCH!!!!! It’s actually too exciting for words. I will have my mum and sister on hand for a bit of help with Mimi so fingers crossed I will have more time to dedicate to the blog as up until now I have only had enough time for interior decoration projects with clients.

So, do you want to see this old run down house of ours that we have bought?! It’s definitely not a looker from the street, that’s for sure…

All images from estate agent Acorn, Catford (who I would highly recommend if you are buying/selling in the area).

The house was built in 1929 and needs quite a bit of work to make it look nicer from the outside. It’s never going to be a handsome house but that was a compromise I was willing to make as I think that everything else about the house will work for us. We don’t have the budget to contract out any of the work to the outside of the house so anything we do will be DIY. I’ll do a more detailed post about it but in brief we plan to paint the outside of the house white, build a new brick wall, tile the path leading up to the door, replace the side access gate, create a porch and use an original 1920s/30’s front door and do some lovely planting to add a bit of green and colour.

The house has been rented out for years and years so it’s in a pretty poor state. The plasterwork throughout is shot, the flooring is horrible cheap laminate sheets, the bathroom is in a horrid state and most importantly it is begging for walls to be knocked down to open out the small rooms. I love the proportions of 1930’s houses as they are so square and the layout really works but this house is very small so we decided as soon as we saw it that it needed to be open plan downstairs. Here is the current floor plan:

I love the way the whole width of the back of the house opens out onto the garden and we plan to make the most of that in the future by building a glass extension but for the time being we will knock down the wall between the two reception rooms and the wall between the back reception and the kitchen.

This is what the front reception and kitchen currently look like:

The reception rooms have their original doors, coving and picture rails and lovely big windows so the house is wonderfully light and by knocking all the rooms downstairs together we hope to make it even lighter. I’ll tell you more about our extension and kitchen plans another time as they won’t be part of the first round of works.

In the future we will also do a loft conversion to make a really good sized master bedroom but for the time being we’re more than happy with the bedrooms as they are. Having a third bedroom, albeit a very small one, will make a massive difference to us as it will give us the extra storage and a guest bed that we didn’t have in the flat.

Upstairs there’s also a bathroom with separate toilet and we plan to knock them together and completely re-do the room, which I’m very excited about as I have never planned a bathroom from scratch.

So, there you have it…a quick tour of our new house as it looked before we bought it. I plan to do some decorating and furnishing inspiration posts as well as detailed posts about some of the DIY jobs we will do that I hope will be helpful on a practical level. Let me know if there is anything particular you would like to know about that I can potentially cover during the renovation project. Our contractor doesn’t start until the end of May but fingers crossed we will be able to move in by the end of summer. I’m so pleased to be back on the blog and look out for lots of new posts soon!

Katy x